Create an Arc Using the CAD Command Line
Use the Create Arc command alias on the CAD Command Line to create a 360° arc at a constant elevation.
Prerequisites:
- License; See the Subscription Plans page. For a license matrix by command, see the License page in the TBC Community. Also see View and manage licensed features.
To create a circle from the CAD Command Line:
- Press [F3] or click the
 icon on the Status Bar to open the CAD Command Line.
 - Type ar or AR at the command prompt, and press [Enter].
- If needed, set the Layer, Color, and/or Line style below the command prompt. These properties persist the next time you run the command.
- Based on the Center and radius mode highlighted at the prompt, pick the center point in a supported view , or type a keyword character to use another mode. The options are:
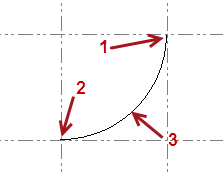
3 points - Enter SME to create an arc based on a start-of-arc point (1 in example below), a middle-of-arc point (that is, a point anywhere along the arc between the start-of-arc point and the end-of-arc point; 2), and an end-of-arc point (3).
Pick each of the three points in the Plan View, enter a coordinate for each, or click the Coordinate Picker icon for options.
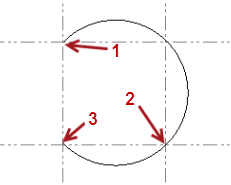
- Start, Center, End - Enter SCE to create an arc based on a start-of-arc point (1), a center-of-arc point (2), and an end-of-arc point (3). Note that the center point must be equal distance between the start and end points.
Pick each of the points in the Plan View, enter a coordinate for each, or click the Coordinate Picker icon for options.

- Start, Center, Angle - Enter CSA to create an arc based on a start-of-arc point (1), a center-of-arc point (2), and a value for the angle of coverage of the arc (3; 90°00'00" in this example).
Pick each of the first two points in the Plan View, type a coordinate for each, or ror click the Coordinate Picker icon for options.
Then enter the angle for the arc in degrees, minutes, and seconds.

- Start, End, Angle - Enter SEA to create an arc based on a start-of-arc point (1), an end-of-arc point (2), and a value for the angle of coverage of the arc (3; 45°00'00" in this example).
Pick each of the first two points in the Plan View, type a coordinate for each, or ror click the Coordinate Picker icon for options.
Then enter the angle for the arc in degrees, minutes, and seconds.
- Start, End, Radius - Enter SER to create an arc based on a start-of-arc point (1), an end-of-arc point (2), a value for the radius of the arc (3), and an indication of whether to create the arc curving to the left or right side ("right" in this example).
Pick each of the first two points in the Plan View, type a coordinate for each, or ror click the Coordinate Picker icon for options.
Then enter the length of the radius for the arc.
Enter L or R to specify whether the arc curves to the right or left from the start point to the end point.

The command remembers the last mode used the next time you run the command.
- Start, Center, End - Enter SCE to create an arc based on a start-of-arc point (1), a center-of-arc point (2), and an end-of-arc point (3). Note that the center point must be equal distance between the start and end points.
- Press [Spacebar] to rerun the command.
