Run Commands from the CAD Command Line
Use the CAD Command Line to run commands by simply entering command aliases, keyboard shortcuts, and values (with occasional picking in graphic views). Most commands for creating and editing 2D and 3D CAD objects are supported on the CAD Command Line. Using the CAD Command Line is more keyboard-focused and therefore more efficient than running commands from the Command Pane.
Prompts on the CAD Command Line guide you through the same sequence and many of the options that are available in the Command Pane. The CAD Command Line accepts alphanumeric input so you can run and provide input to the commands all from your keyboard. As you work through a Commadn Line sequence, your entries and any results are shown and will scroll up in the log above the CAD Command Line.
Note: The pane-based versions of the CAD Command Line commands may have additional options not offered on the CAD Command Line.
Prerequisites:
- License; See the Subscription Plans page. For a license matrix by command, see the License page in the TBC Community. Also see View and manage licensed features.
To access the CAD Command Line:
- Press [F3].
- Click the
 icon on the Status Bar.
To use the CAD Command Line:
- Type a command alias (see Supported Commands below) and press [Enter].
- If needed/applicable, set the Layer, Color, and/or Line style below the command prompt.
Note: If you change these (or any other property via the Properties pane) These properties persist the next time you run the command.
- Follow the in-line prompts to enter values or select different options via keyword shortcuts. You can either enter the underlined letter of the keyword shortcut or click it to select the option.
- Press [F3] to close the CAD Command Line. The log (CAD Command Line history) is cleared.
Views that CAD Command Line commands can be used in:
Most CAD Command Line commands are CAD commands, so they can be used in all the same views that the pane-based CAD commands are. These views include the Plan View, 3D View, Sheet View, Cross-Section View, and Cutting Plane View, although each view may have unique limitations. For example, to specify polyline points in a 3D view, you would have to pick existing objects.
Options:
- [?] - Enter this on a blank CAD Command Line to show a list of the available command aliases.
- [Enter] - Generally, press this at a an in-line prompt (without entering a keyword or value), to enter the highlighted default.
- [Escape] - Leave the current command and return to the command alias prompt.
- Undo/Redo - Press [Control] + [Z]/[Control] + [Y] or click the Undo/Redo icons on the Quick Access Toolbar. Some Command Line commands also offer Undo as an option during the flow by entering the U shortcut.
Supported commands:
- Each command has multiple aliases (abbreviations of the name) that you can use to launch it. See the CAD Command Line Quick Reference Guide.
Auto-completion/Suggestion of command names
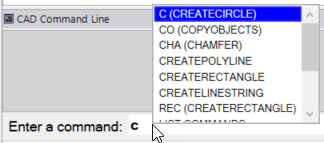
When you start typing a command alias (or name) on the CAD Command line, a list of suggested commands appears at the location of your cursor (regardless of where it is on your screen). For example, if you type C, the list shows the closest command names in this order:
- The command with the specific alias of the letter you typed
- All commands with similar aliases that start with the letter and additional letters you might type next
- All full command names that start with the letter
- All other command aliases and full command names that contain the letter (or letters) you type
Click a list entry or use your keyboard's Up and Down keys to select the command you need and press [Enter] to launch it. Press [Escape] to close the list if you do not select a command.
Language support in the suggested commands list
Command names in the list are translated into all supported languages (so you can type a command name in your language), but the aliases are not. For example, P is the alias for the Pan command in every language.
This feature is useful both for learning other command line aliases and for speeding up their selection. Because the auto-complete list appears next to your cursor, it also enables you to work in a more 'heads-up' manner.
