Link a Reference File to a Project
Use the Reference File Manager command to link to a VCE (.vce) project whose data you want to display in your current project for referencing purposes, including points, CAD lines, labels, and surfaces (point clouds are excluded). You cannot edit any of the reference objects displayed in your current project; however, you can reference them when creating new objects. For example, you can use snap commands to snap to a reference object when creating a new CAD object.
Due to dynamic linking, any changes saved in the selected reference project will be reflected in the linked reference data in your current/active (referencing) project any time you reopen it, or when you select to manually perform a reference update as described below.
Prerequisites:
- Licensed feature. See the Subscription Plans page. For a license matrix by command, see the License page in the TBC Community. Also see View and manage licensed features.
- Reference file (.vce project) with data you want to reference
To link a reference file to a project:
Note: To avoid unexpected results, you should ensure that the reference project uses the same coordinate system as the referencing project. After linking to a reference project file, you can can view the reference project's coordinate system in the Reference File Properties pane to verify it matches.
- Select Reference File in Home > Data Exchange.
- In the Open dialog, select the project VCE (.vce) file containing the data you want to display in your current (referencing)project and click the Open button.
The following occurs:
- The objects included in the reference file are displayed in the graphic views in your current project. Solid colored reference objects and surfaces are displayed with transparency applied to help differentiate them from other objects in your project.
- All reference objects, including surfaces, ar displayed based on their Properties settings in the reference project.
- A new Reference File parent node displays in the Project Explorer. Nested beneath it is a Reference File node representing the reference file you selected.
- A new Reference Files list is added to the View Filter Manager to allow you to easily hide and show the reference objects in your graphic views.
- The View Filter applied in the reference project is applied to the displayed objects in the referencing project. However, you can also Manage Reference File View Filters with a different command (or select a different filter using the Properties pane as described below.)
Before linking a reference file:

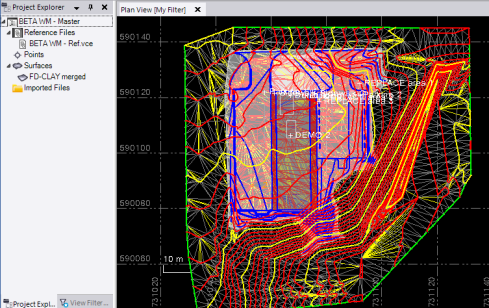
After linking a reference file:
Notes:
You cannot edit any of the reference objects displayed in your graphic views. However, you can reference them when creating new objects in your project. For example, you can use snap commands to snap to a reference object when creating a new CAD object. (Line intersect snaps will not work with linked reference lines.) The newly created CAD objects display and are editable in your project even if the reference data is hidden or removed.
If you are working in a view that does not support visual snap indicators (such as 3D View) or visual snap indicators are turned off, you cannot snap to objects in the reference file.
All surfaces in the reference file are displayed in your project's graphic views; however, they are read-only and are not selectable in the Project Explorer or in any surface selection drop-down lists. This means that you cannot use any of them in surface related commands, such as creating surface contour lines. However, you can use the Create Surface from Reference File command to create a new reference surface in your project based on any of the linked reference surfaces. The new reference surface is selectable and can be used in conjunction with many of the surface-related commands. See Create a Surface from a Reference File for more information.
- To view and/or change properties controlling how the reference file displays in the project, right-click its node in the Project Explorer and select Properties to display the Properties pane.
Each of the available fields includes a tool tip at the bottom of the pane explaining its use. For example, you can change the file location for the reference file if it has been moved, adjust the transparency of linked reference data in your graphic views, and select whether to add/update reference files that are locked (in use).
Note: You can use the View Filter drop-down list in the Properties pane to apply any of the view filters defined in the reference project to the reference data displayed in your current project.
- To show or hide reference objects in your project, select View Filter Manager in Views > View. Then click the appropriate Reference Files check box(es).
If you have created CAD objects in your project based on linked reference objects, they will continue to display until you choose to hide them using the View Filter Manager. Also note that all View Filter Manager check boxes (other than the Reference Files check boxes) have no impact on the display of reference project data in the graphic views. See Manage Reference File View Filters.
To update the reference data in your project when the linked reference project has been updated AND SAVED:
- When you open your project, it is automatically updated with any linked reference file changes (unless the reference file is locked (in use) and the Reference File Properties setting Ignore lock file is set to No).
- If the reference file is updated AND SAVED while you are working in your project, the Reference File node displays in red in the Project Explorer. Right-click the node and select Reload Referenced File to update the reference data in your project.
