Use an Image as a Texture
Use the Material and Site Improvement Manager to specify image files as material textures so they can be used in the Add Surface Texture command to make visualization of your 3D model more realistic. Select an image file to use as a texture swatch and associate it with the material. Then specify a size to apply to the swatch when it is tiled. If the surface is larger than the image tile, the texture is repeated until it reaches the edge of the surface or a texture boundary.
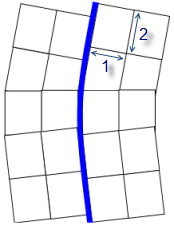
If the surface is a corridor, the texture is not aligned along easting and northing coordinates, as it is on a generalized surface. Instead, station and offset values from the corridor's alignment are used; the texture is aligned along the roadway, making it more realistic.
Prerequisites:
- A material for which you want to specify a texture
- An image of a texture (.gif, .jpg, .png, or .tif); ideally the image is one that has been edited so that the edges match when the image is tiled
To specify a material texture:
- Select Material and Site Improvement Manager in Surfaces > Subgrade.
- In the explorer pane, select the material for which you want to specify a texture.
- Next to the Texture box, click the Browse button and navigate to the texture image file that you want to use for the material.
- If necessary, edit the image size:
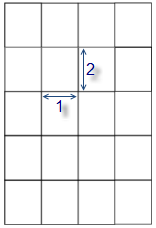
- Horizontal size - Specify the width of the texture tile in the current project units. If the texture is applied to a corridor surface, the height of the tile runs parallel to the alignment of the corridor.
- Vertical size - Specify the height of the texture tile in the current project units. If the texture is applied to a corridor surface, the width of the tile runs perpendicular to the alignment of the corridor.
|
|
|
|
(1) Horizontal size and |
(1) Horizontal size and |
- If you have edited a material in the External Library that you want to make available in your project, select Edit > Copy from External Library to make it available in the Project Library.
- Select another material to add a texture image to, or click Close.
- To apply the material to a surface, see Add a Texture to a Surface Area.
Scenarios:
- When you specify a texture image for a material in the External Library, the path to the image appears in the Texture box. If you add a texture image to a material in the Project Library, only the file name appears in the box. A copy of the file is saved at:
C:\Documents and Settings\(user name)\My Documents\(product name)\(project name)\
- When a surface has a material color, texture image, and draped image applied to it, the material overrides the color and the draped image overrides the material.
