Create a Plotbox and Print its Contents
Use the Create Plotbox command to specify an area that you want to print or plot by creating a box (plotbox) around that portion of your data in the Plan View.
Plotboxes help you control the scale and contents of the data you want to appear in your output. Once you create a plotbox, it can be moved, rotated, scaled, and copied like other objects.
Note: This command presumes that you know the printable area that your plotter or printer will output, as well as the scale at which you want your data to appear.
Tip: You can right-click a plotbox and select Copy View to Clipboard to copy a screen image of a plotbox's contents so it can be pasted into another program, such as Trimble SketchUp.
Prerequisites:
- Data in the Plan View
To access the command:
- Select Create Plotbox.
To create a plotbox:
- In the Name box, type an identifier for the plotbox as you want it to appear in the Project Explorer, Selection Explorer, and graphic views. You can later use the name to select the box in the Advanced Select command.
- Select the layer on which you want the plotbox to reside.
Tip: To make plotboxes easy to hide, place them all on a new layer and hide that layer in the View Filter Manager.
- To specify the paper space scale at which you want to print the drawing in the Plot scale box.
By default, the plot scale is defined in Project Settings > View > Plan View. Typically, this is 100 feet/inch or 1 m/mm. Whatever you set in this box will be multiplied by the width and height you specify below. - Select the size that you want to plot in Standard paper sizes list, or select Custom to define a unique size. Your selection in this list determines the plotbox's height and width that appear below it. The plotbox width and height reflect the 'printable area' (the selected paper size minus a standard margin area that most printers cannot access).
Note: The size that you specify for the plotbox is independent from the paper sizes that your printer or plotter can output. For instance, you could specify to create a Letter (8.5x11 in) plotbox (7.7x10.2 printable area default) to print on your 36" plotter. Specify the printer, orientation, and paper size you will use in Page Setup and Print, not in this command.
- If needed (or if you selected Custom), edit the width and height of the printable area. Remember that the plotbox is defined by the height and width in sheet units multiplied by the Plot Scale you defined above.
Note: You can specify the size of the plotbox graphically by clicking points in the Plan View that encompass the extents of the data you want to print.
- Specify a location for the lower left corner of the plotbox in the Location box.
- Specify a rotation angle for the plotbox in the Angle box. Positive rotation is clockwise and zero is due east.
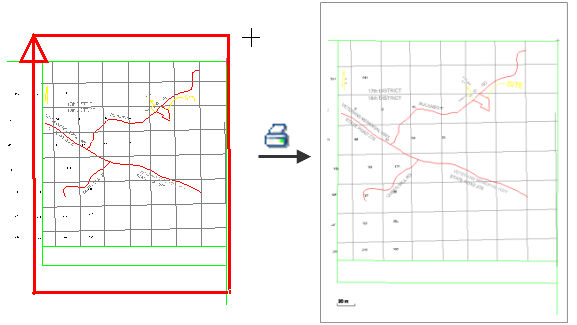
- Click Add. The plotbox appears. An arrow on the plotbox helps you distinguish it from other shapes in your data.
- Repeat steps 1 - 8 to make additional plot boxes.
- To make adjustments to the plotbox, use the Properties pane. To change the position or angle of the plotbox, you can also use the Move/Rotate/Scale Objects command.
To print a plotbox:
- Right-click the plotbox that you want to plot in the Project Explorer or the Plan View and select Print Preview from the context menu.
- If everything looks good and you know that your printer is set up properly, you can click the Print icon to print from there. Otherwise, click Close and select Print from the plotbox's context menu.
- Confirm your printer properties and click OK.
Note: You can use the Grid text scale field in the plotbox's Properties pane to change the size of labels in the printout. For example, if the labels are too small, increasing this value will make them larger.
Note: If you created a plotbox, but are having trouble getting the contents of the box to print or plot on the size of paper you specified for the plotbox, either adjust the plot scale in the Properties pane or use the Fit Plotbox to Printable Area command to adjust the size to the area that the printer can handle.
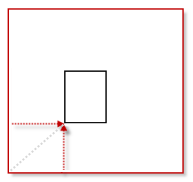
Note: In the Properties pane, the Manual offset group enables you to position a smaller plotbox on a larger paper, e.g. if you want to print a standard page size on a plotter. Set Use manual offset to Yes. Then specify a horizontal and vertical distance from the lower left corner of the sheet you are printing on for the position of the lower left corner of the plotbox (see below).
|
|
|
|
|
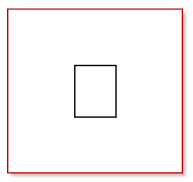
8.5x11" printed on 36" paper |
Manual offset is On, but no horizontal or vertical offset is specified. The lower left corner of the plotbox is placed at the lower left corner of the sheet (minus the margins). |
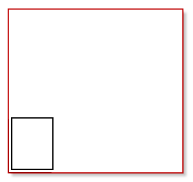
Manual offset is On, with 10" horizontal and vertical offsets specified. The lower left corner of the plotbox is placed 10" up and over from the lower left corner of the sheet (minus the margins). |
Options:
- Plot scale - Specify the scale at which you want your data to print. This scale is used with the height and width you specify to determine the required ground units.
- Standard paper sizes - Select the sheet to which your printer or plotter can print.
- Plotbox width/height - These boxes show the size of plotbox you selected minus a standard margin (in case you decide to print on a sheet of paper the same size as the plotbox). You can edit these if you find that the printable area for your printer or plotter is smaller than the default set for the paper.
- Location - Pick a point in the Plan View for the lower, left corner of the plotbox (and thereby of the paper on which it is plotted). Once the plot box is created, this origin is denoted by a small red square.
- Angle - Specify how much to rotate the plotbox from parallel to the x axis. The rotation is clockwise.
- These options and additional settings for a plotbox are also available in the Properties pane.
Scenarios:
- If you have no plotbox or more than one plotbox selected when you print, the entire current graphic view will print instead of the contents of any plotbox.
- If the size or aspect ratio of the plot box does not match the paper you have selected in the Print dialog, the printed output will be cropped accordingly (unless you use the Fit Plotbox to Printable Area command).
- If there is a conflict between the orientation in the Page Setup dialog and the Print dialog, the Print dialog's setting supersedes the Page Setup dialog's setting.
