Process Panoramas
The Process Panoramas command allows you to improve the visual quality of photo panoramas captured by photo stations by balancing the exposure and/or blending the edges of the panorama's photo images.
When you select to balance the exposure and/or blend the edges of a panorama's photo images, a new processed version of each original (unprocessed) image file is created and stored in the same project subfolder as the original file. The newly processed images are displayed on the Station Viewtab as part of the station's panorama and they are included if you export the panorama to a KML/KMZ file or JPEG file. If you remove processing results, the processed version of the image files is deleted. The original image file is never modified in any way.
Note: If you imported TDX/TZF scan files from the Trimble X7 scanner and created station panoramas on import, do not process the panoramas using the Process Panoramas command. The images are already balanced and blended and further processing can cause unwanted results.
Prerequisites
- See the Subscription Plans page. For a license matrix by command, see the License page in the TBC Community. Also see View and manage licensed features.
- Your graphics card must be compatible with DirectX 11 or higher to process panoramas.
- For the Balance exposure option (see the following instructions) to work correctly, images must have been taken by a photo station with the Exposure set to Auto.
To process panoramas:
- Select Process Panoramas in Point Clouds > Deliverables.
The Process Panoramas command pane displays showing all of the project's photo stations. To the immediate right of each Station name field is an Images field showing the number of images captured by that station.
- Click the Station View button
 located to the left of the Station you want to process.
The Station View tab displays for the selected station, showing a panorama of the combined images. This allows you to view the results of the processing.
Note: This step is optional at this time. You could, as an alternative, perform processing on any or all of the photo station panoramas in the project first, and then view the resulting panoramas on each station's Station View tab as necessary. However, because processing time can be lengthy, you might want to process only those stations in your project that require it.
- Select either or both of the process option check boxes:
- Balance exposure
 - Check this check box to balance the exposure among all of the photo images in the panorama to make them look as similar as possible. To achieve a more uniform look, some images may be darkened while others may be lightened .
 - Blend edges
 - Check this check box to blend the edges of adjoining photo images in the panorama so that the edges of the images are less noticeable.
Note that you can click the process icon button located at the top of each list to check all of the station check boxes for that process.
You might start by processing the panorama using only the Balance exposure option. This will often provide adequate quality improvement. If you need to enhance the panorama further so that the edges of the individual photo images are less noticeable, you can reprocess using the Blend edges option as well.
- Balance exposure
- Click the Process button.
A progress bar is displayed for each station whose images are being processed. If you want to stop processing for a specific station, click the Stop button
 located to the right of the progress bar.
 After processing is complete, a check mark remains in the check box, which is highlighted in green, indicating the processing has been performed. To remove processing, uncheck the check box and click the Process button.
To perform additional processing on a panorama that has already been partially processed (for example, the exposure was balanced but the edges were not blended), select the check box for the process you want to perform and click the Process button. The new processing is performed, in addition to the processing already performed.
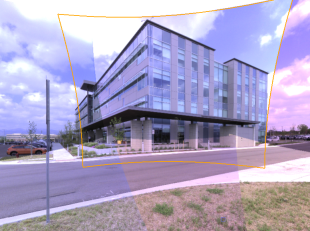
Before processing:
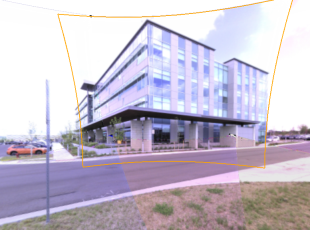
After processing:
- If you have not already done so, click the Station View button located to the left of the Station field to view the processed panorama on the Station View tab.
- Optionally, do either or both of the following:
- If you want to export the panorama image to a Google Earth KML/KMZ (.kml/.kmz) file, click the Export Kml/Kmz button located in the pane's toolbar. For additional instructions, see Export Google Earth Files (.kml/.kmz).
- If you want to export the panorama image to a JPEG file that can be viewed in any graphics viewer, click the Export Jpeg button located in the pane's toolbar. For additional instructions, see Export Digital Image Files (.jpg/.jpeg).
Note: Cubic panoramas, such as those imported from Trimble X7 and X9 3D laser scanners, are exported from TBC with a fixed size instead of being sized dynamically as is done with spherical panoramas. This ensures cubic panoramas are exported to their full extent.
