Export Google Earth Pro Files (.kml/.kmz)
You can export a variety of project data to a KML (Keyhole Markup Language) or compressed (zipped) KMZ file that can be opened and viewed in Google Earth Pro. This includes points, stations, observations, labels, linework, media files, feature data, and photo station panoramas.
Note: The export must include coordinate data to properly position the exported objects on the Google Earth Pro map.
Prerequisites:
- If you are exporting photo station panoramas from your project:
- If you have not already done so, log in to Trimble Identity prior to exporting panoramas. Otherwise, you will prompted to do so at the time of export.
- You might want to first improve the visual quality of the panoramas by balancing the exposure and/or blending the edges of the panorama's photo images as described in Process Panoramas.
To export a Google Earth Pro file:
- Select Export in Home > Data Exchangeto display the Export command pane.
- Select the GIS tab. Then select Kml/Kmz exporter in the list.
- Click in the Data field. Then select the data you want to export in a graphic or spreadsheet view.
Click the Options button for additional selection options.
If your project includes panoramas, their associated photo stations are displayed in the Export station panoramas list, allowing you to select the stations whose panoramas you want to include in the export.
Note: Cubic panoramas, such as those imported from Trimble X7 and X9 3D laser scanners, are exported from TBC with a fixed size instead of being sized dynamically as is done with spherical panoramas. This ensures cubic panoramas are exported to their full extent.
- If applicable, in the Export station panoramas list, check the stations from which you want to export panoramas.
When you check a photo station in the list to export its panorama, the station is automatically added as a selection in the Data field, if it has not already been selected.
- Optionally, check the Open in Google Earth check box to specify that the newly created file automatically open in Google Earth Pro when the export is complete.
- Optionally, change the name or location of the export file using the File Name field.
By default, the export file is named the same as the project and is stored in the project folder.
- In the Output file type drop-down list in the Settings section, select the appropriate format type:
- Output kml file - Select this option to create a KML (.kml) file that contains all of the selected project data to be displayed when the file is opened in Google Earth Pro, along with a new TBC project subfolder named files that contains attached image files (if applicable). If the export includes photo station panorama files, they are stored on Trimble servers where they can be automatically downloaded and displayed when selected in Google Earth Pro. (Panorama files are not stored locally.)
Note: If you want to share with other users a KML file that references attached image files, you must include the files subfolder. Both the KML file and the files subfolder must be stored in the same folder for images to display in Google Earth Pro. As an alternative, you can create a KMZ file that automatically includes the KML file and the files subfolder in the same KMZ folder, providing a single file-transfer sharing workflow. See the next bullet.
- Output kmz file - Select this option to create a KMZ (.kmz) file that contains in a compressed (zipped) file format all of the selected project data to be displayed when the file is opened in Google Earth Pro, along with a KMZ subfolder named files that contains any attached image files (if applicable). Like the KML option, station photo panorama files are stored on Trimble servers where they can be automatically downloaded and displayed when selected in Google Earth Pro.
Note: There is no need to create an account or log in the Trimble server in able to automatically store linked image and panorama files. The process is handled automatically.
- Output kml file - Select this option to create a KML (.kml) file that contains all of the selected project data to be displayed when the file is opened in Google Earth Pro, along with a new TBC project subfolder named files that contains attached image files (if applicable). If the export includes photo station panorama files, they are stored on Trimble servers where they can be automatically downloaded and displayed when selected in Google Earth Pro. (Panorama files are not stored locally.)
- Optionally, in the offset fields, enter any offsets you want to apply.
You might find it necessary to use offsets to adjust your exported data so that it is correctly positioned on the map in Google Earth Pro.
- In the Altitude mode drop-down list, select one of the following:
- Clamp to Ground ensures all points are located at ground level.
- Absolute ensures all points are displayed at their correct elevation based on the offset values you entered.
- Click the Export button.
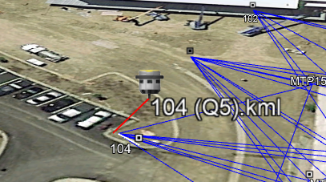
To view an attached photo image (media file) in Google Earth Pro, click the point to which the image is attached in the Places list. Or, click the point's camera icon in the map view.

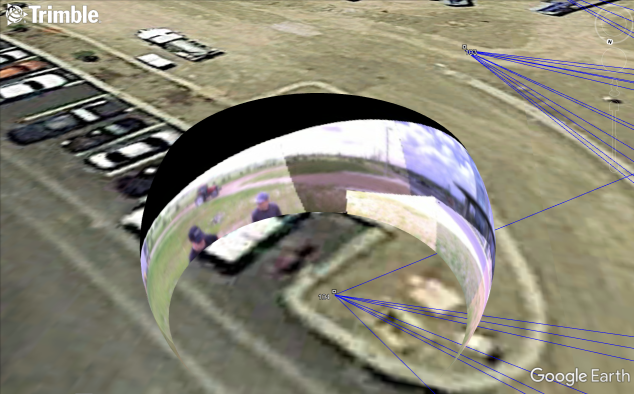
To view a photo station panorama in Google Earth Pro, double-click the station in the Places list. Or, double-click the station's camera icon in the map view.