Workflow for Bentley-Trimble i-model (.icm.dgn) Data Exchange
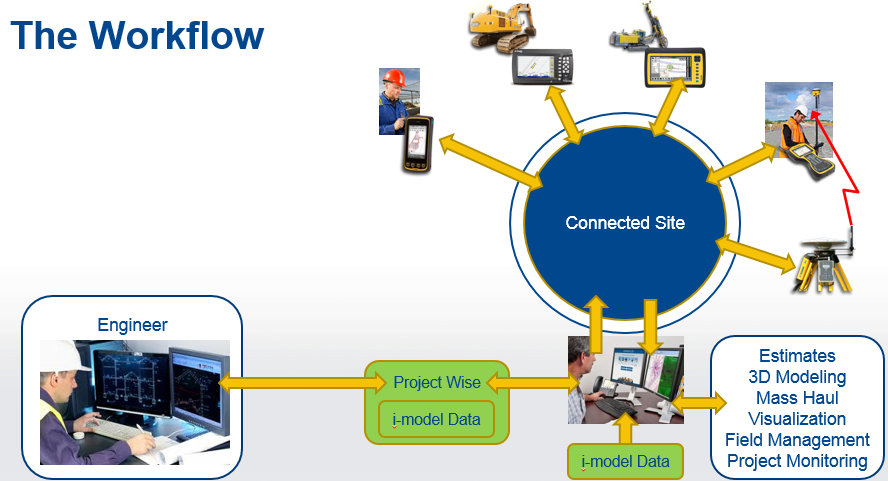
The goal of this Bentley-Trimble workflow is to guide you through an enhanced connection between the virtual and physical environments for infrastructure and construction site projects. When design and engineering teams use Bentley ProjectWise and Trimble Business Center to link design offices to construction sites, designers and contractors can collaborate more effectively on constructible models. This integrated and managed workflow enables more efficient bidding and estimating, faster project approvals, reduced change orders, and shortened construction timelines.
Bentley’s V8i (SELECT Series 3) civil engineering software generates i-model (.icm.dgn) files from detailed designs. These designs, when managed in Bentley ProjectWise, can then be easily imported into Trimble Business Center for construction preparation and management. To optimize construction management processes and maximize information transfer, Trimble® Connected Site® technology can then be used to send these designs wirelessly to machines and field systems on a construction site, thereby increasing productivity and reducing data exchange problems (where data was lost or could not be read directly by contractor's tools).
Key components of the workflow include:
- Bentley ProjectWise - ProjectWise is a system of project collaboration servers and services that provides an environment for work-sharing, content re-use, and dynamic feedback for the design and construction of architecture, engineering, construction, and operations (AECO) of infrastructure projects.
- Bentley i-model (.icm.dgn) Files - Infrastructure Construction Models (ICMs) provide a rich data exchange format for Bentley civil design products based on the OpenRoads SELECTSeries 3 (SS3) platform, facilitating the exchange of both CAD information (layers, colors, line styles, names, etc.) and civil design objects (alignments, surfaces, corridors, meshes, linework, points, etc.) within a single transfer mechanism.
Trimble Business Center - Features that support i-model (.icm.dgn) files in this program include:
- i-model (.icm.dgn) importer - This importer enables the import and the intelligent reading of an i-model (.icm.dgn) files contents, along with accurate mapping of civil design objects to constructible objects that can be readily moved out to Trimble field systems using standard field data management tools.
- External services connection to ProjectWise - This feature allows you to set up ProjectWise as an external service, including the ProjectWise server name, your user name, and password, which can then be used in the commands below:
- Open Remote File - This command allows you to open i-model (.icm.dgn) files, as well as native VCE project files, from ProjectWise servers. You can also locate, retrieve, and import other file types from the ProjectWise servers, including PDF, DXF, DWG, DGN, LandXML, CSV, TXT, GENIO and other supported file formats.
- Save File Remotely - This command enables you to save native VCE projects to the ProjectWise servers, allowing Trimble Business Centerto join the software ecosystem deployed by the contractor or engineer on the ProjectWise server. This information sharing with the ProjectWise community allows for the passing of RFIs or as-built records back to the original engineer or owner upon completion of construction processes. You can also export directly to an external service using the Export command.
Workflow
- Prepare your data in a Bentley civil product with OpenRoads technology (InRoads, MXROAD, or GEOPAK that has been upgraded to SELECT series3 MR2):
Note: These first steps are not intended to replace Bentley documentation on preparing your design data to create an i-model (.icm.dgn). Please see the help for your specific Bentley civil product. The steps should be similar in the Bentley civil products mentioned above.
- Create the existing terrain and/or infrastructure design data that you want to send to the field via Trimble Business Center.
- Ensure that the objects you want to export to the i-model (.icm.dgn) are civil objects:
Select File > Project Explorer. Click the Civil Model tab and expand groups to see which object are included in the civil model. - Set an appropriate Design Stage for each corridor section you want to include in the ICM:
On the Civil Model tab in the Project Explorer, expand the groups under a civil object that contains a corridor. Under Corridors, identify a corridor section that should be assigned a design stage. Select Tools > Selection > Element Selection, and graphically pick the corridor section. Select Element > Information. In the Corridor section of the Element Information pane, select a design stage. - If needed, specify to include a corridor and/or component meshes in the i-model (.icm.dgn):
In the Project Explorer, click the Civil Standards tab. Expand the groups under the civil object that contains the corridor, and then expand Project Settings and Corridor Design Stages. Select a design stage. In the Element Information pane under Output Settings, set Create Top Mesh and/or Create Bottom Mesh to True. Edit any other output settings, as needed. - Process the objects for the i-model (.icm.dgn):
Click the Civil Model tab in the Project Explorer, right-click the parent civil design objects that you want to include, and select Process All Objects. Processing can also be done on individual civil objects using the Process Corridor command.
- Create and save the i-model (.icm.dgn) to ProjectWise:
- Once all of the civil objects have been processed, select Tools > Tasks. Expand Corridor Modeling, and click the Create i-model (.icm.dgn) icon
 .
. - Check the boxes for Design Model and/or Terrain Model, and click Ok.
- Include Design Models - Select this to export horizontal and vertical geometry, including station equations, corridor models, and civil cells (blocks) along with their resulting geometry and surfaces meshes (including alternative surfaces, where created).
Note: Existing corridor data produced prior to SS3 MR2 requires reprocessing to ensure that required corridor data (denoting top and bottom features and top and bottom meshes) is included.
Note: Area templates that are common in civil cells may require turning on linear features to generate the required geometry associated with the surfaces. - Include Terrain Models - Select this to export all terrain data stored in the current and referenced models. Native MicroStation graphics are not automatically included in the i-model (.icm.dgn) exchange. However, if they are promoted into the civil model by applying a civil feature definition, then they are included as geometry in the i-model (.icm.dgn).
Tip: Since terrain models can be large, consider separating the Design Model and Terrain Model into two separate i-model (.icm.dgn)s. Also consider using traditional exchange formats for the terrain model using native file formats, rather than an i-model (.icm.dgn). This can help address memory concerns.
- In the Create i-model (.icm.dgn) file dialog, add a name, confirm the .i-model (.icm.dgn).dgn file extension, and click Save.
- When the program finishes creating the i-model (.icm.dgn) repository, open ProjectWise Explorer and upload/save it to ProjectWise.
Note: By default the i-model (.icm.dgn) will be called <filename>.i-model (.icm.dgn).dgn. You cannot rename the file to *.i.dgn or *.dgn and successfully read the file using i-model readers nor DGN readers.
Note: i-model (.icm.dgn)s cannot be created by the Publish i-Model command.
- Once all of the civil objects have been processed, select Tools > Tasks. Expand Corridor Modeling, and click the Create i-model (.icm.dgn) icon
- In Trimble Business Center, configure External Services with a ProjectWise username and password.
- Open/import the i-model (.icm.dgn) from ProjectWise to a local folder using the Open Remote File command. If you have an i-model (.icm.dgn) file outside of ProjectWise, you can simply import it into Trimble Business Center. For details on how i-model (.icm.dgn) data is handled using either method, see Import Bentley i-model (.icm.dgn) Files.
- Explore the various objects that were created on import and the layers they reside on to confirm that the model has been formed as expected.
- Create and/or edit additional objects (points, surfaces, alignments, corridors, etc.) as needed.
- Run takeoff and mass haul calculations and reports.
- Visualize your project in various views (Profile, Cross-section, 3D, 3D Drive, Walk-Through).
- Prepare field data for use by construction crews on the job site. This data might include site data, design data, and work orders to be used on SCS site controllers and site and design data to be used on GCS machines.
Using site controllers, you can then measure material volumes, monitor grades and laid material thickness, and perform other site-related tasks, such as point, line, roadway, and surface stakeout. With machines, you can perform scraping, grading, excavation, and compaction activities with accurate guidance, and blade and bucket positioning.
- Make the data available to field workers on the Connected Site.
- Import measured and as-built results from the field back into Trimble Business Center.
- Export data files or save your Trimble Business Center project back to ProjectWise so engineers and other stakeholders can review the construction project's status and make design changes.
