Running Snap Mode Options
Use the following options to set which frequently-used snaps are constantly enabled, so that you do not have to initiate a specific command each time you need a snap. They are available in the Running Snap Mode Options dialog.
|
Snap set |
|
| Snap set |
TBC stores snap settings by project. Using a snap set stores the snap settings per user. Use CTRL + SHIFT + S to toggle through the snap sets. |
| Save |
Save a snap set. |
| Delete |
Delete a snap set. |
|
Object snaps tab |
|
| Point |
If a point object is inside the pick aperture, the coordinate of the point will be used. |
| Point cloud |
If a point object is in a point cloud, the nearest point to the cursor will be used. |
| Near point |
If a point on the segment is inside the pick aperture, the coordinate of the point will be used. |
| End point |
If the end point of a line or arc segment is inside the pick aperture, the coordinate of the end point will be used. |
| Midpoint |
If the mid point of a line or arc segment is inside the pick aperture, the coordinate of the mid point will be used. |
| Perpendicular point |
If the perpendicular point to the segment is inside the pick aperture, the coordinate of the point will be used. |
| Intersection point |
If the intersection of two lines is inside the pick aperture, the coordinate of the point will be used. |
| Center point |
If the center point of an arc segment is inside the pick aperture, the coordinate of the center point will be used. |
| Tangent point |
If the tangent point to the segment is inside the pick aperture, the coordinate of the point will be used. |
| Circle quadrant point |
If the quadrant point to the circle is inside the pick aperture, the coordinate of the point will be used. |
| Insertion point |
If any part of a text or block object is inside the pick aperture, the insertion point of the object will be used. This running snap mode is disabled by default. |
| Surface vertex |
If a surface vertex or 3D mesh vertex is inside the pick aperture, the coordinate of the vertex will be used. |
| Free |
The coordinate at the intersection of the cross hairs will be used. This mode will be used if none of the other modes are satisfied or selected. If no other modes are active, the Free mode is active by default. |
| Display visual snap indicators (check box) |
Select this check box to specify that snap points include visual indicators, making them more visible and easier to use. When your pick aperture touches a CAD object that supports snaps (for example, a line segment), the snap points on the object are displayed for several seconds. When you move the pick aperture over one of the displayed snap points, a symbol displays indicating your selection. A different symbol is displayed for each of the various snap point types:
|
| Increase Priority / Decrease Priority |
Use these Snap Mode Priority buttons to move snap modes up (higher priority) or down (lower priority) in the Snap modes list. When more than one snap mode can display for an object, the snap mode positioned higher in the list is the one displayed. For example, a line that ends where it intersects with another line could display either the end point snap for the line or the intersection point for the two lines, depending on which snap option is higher in the Snap modes list. |
|
Ortho snaps tab Use ortho snaps to create rectangular CAD geometry (for such objects as foundations, buildings, and so on) more efficiently by easily ensuring the linework created consists of exactly 90-degrees angles. Note: When you select to use an ortho snap option, other selected snap options are still applicable when you make your pick, allowing you to override the restrictions of the ortho snap. |
|
| Off |
This option turns off Ortho snapping and Ortho tracking. If the Off option is selected, you can press the Shift key to temporarily turn Ortho snapping on. |
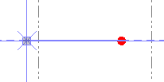
| Ortho |
This snap option results in a new "free" point that is aligned either horizontally or vertically with the previous (anchor) point depending on whether the X distance between the anchor point and cursor position is greater than the Y distance (horizontal) or the Y distance is greater than the X distance (vertical), at which time the cursor changes to an X.
This option requires that the Free snap option also be selected. If the Ortho option is selected, you can press the Shift key to temporarily turn Ortho snapping off. In addition, you can toggle the Ortho snap option on and off using the Toggle ortho snap mode button |
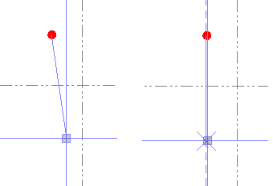
| Ortho tracking |
This snap option results in a new "free" point that is aligned either horizontally or vertically with the previous (anchor) point (orthogonal to the axis) only when at least some portion of the pick aperture is positioned on the horizontal or the vertical line of the anchor point, at which time the cursor changes to an X (right below).
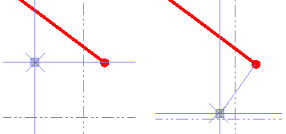
The size of the pick aperture (specified in the Optionsdialog) determines the tolerance used for the snap. This option requires that the Free snap option also be selected. If the Ortho tracking option is selected, you can press the Shift key to temporarily switch to Ortho snapping. If you are creating a new segment for a linestring or polyline using the Ortho tracking option, you have the option of creating the new segment orthogonal (perpendicular) to the axis as described above (left below), or orthogonal to the previous line segment (right below), depending on the location of the cursor.
|