Save and Use Defined Views
Use the Defined Views command to save one or more viewpoints for any of the graphic views. Then you can return to any of these defined viewpoints whenever you need to. Defined views are also saved with your project so you can share specific perspectives of your model with your colleagues when you share your project.
In addition, you can launch Presentation Mode from within the Defined Views command. Presentation Mode displays each of your defined views in the order in which you have them arranged. For more information, see Use Presentation Mode.
|
|
|
|
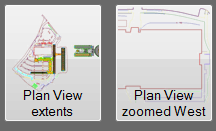
Defined Plan Views sample |
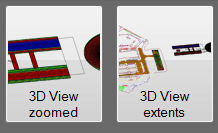
Defined 3D Views sample |
Defined Views and View Filters, Object Properties, and Selection
- A view filter with the active view's current view filter settings is created for each defined view. This view filter appears in the View Filter Manager's filter list with the name DV: <the defined view's name>. DV stands for Defined View.
- In general, object properties are not saved in defined views. For example, if you set a line weight and line style for a line, save the line in a defined view, then change the weight and style and reload the view, the new weight and style are shown. The exception is for surfaces. For surfaces, these properties are saves in defined views: Color, Transparency, and the properties in the Show in Plan View and Show in 3D View sections.
- The selection/highlighting of objects is not saved in defined views. Use selection sets and the Selection Explorer to recall selections of objects. However, if you have an object selected, it remains selected in whatever defined views you load.
- Gridlines and scalebars are not saved in defined views.
Prerequisites:
- Licensed module; See the Subscription Plans page. For a license matrix by command, see the License page in the TBC Community. Also see View and manage licensed features.
To access the command:
- Select Defined Views in Support > Viewing Tools.
To add and use defined views:
- Click the tab for any graphic view to make it the view active.
- Use the mouse gestures defined in 2D View Navigation or 3D View Navigationto reach a desired viewpoint in the view.
- Click Create to save what is displayed in the view as a defined view. A thumbnail of the defined view appears in the command pane.
Note: Since views can be of various aspect ratios, the thumbnail captures the center of the view.
- Repeat steps 1 -3 to add as many other defined views as you want.
- Click-and-drag the thumbnail for any view you want to discard to the trash can Trash icon.
You can also select a defined view's thumbnail and click the trash can icon to delete the defined view.
- Any time you want to return to a defined view, reopen this command, click the tab for the view in which the defined view was created, and click a thumbnail to return to the saved viewpoint.
To arrange defined views and launch Presentation Mode:
- Click-and-drag the defined view thumbnails into the order in which you want them to sequentially display when in Presentation Mode.
Tip: When a thumbnail is selected, you can also use the [+] and [-] to move it up or down in the order.
- Select Presentation Mode in Support > Viewing Tools (or press [Shift] + [F12]).
Dependencies:
- Each defined view is dependent upon a combination of current properties and properties and view filter settings saved with the view. See Defined Views and View Filters, Object Properties, and Selection above.
