Preview Legal Descriptions and Edit Templates
The Description Template Editor, which is accessible from the Legal Description Writer command pane, allows you to preview legal descriptions you are in the process of creating, make changes to the output, and/or edit the template used to create the descriptions. A legal description template specifies how values and phrases are formatted in a legal descriptions document.
Prerequisites:
- See the Subscription Plans page. For a license matrix by command, see the License page in the TBC Community. Also see View and manage licensed features.
To preview and edit a legal description:
This procedure assumes that you have used the Legal Description Writer to select a template, specify starting points and path segments, and select parcels and polygons to include in the descriptions, and you are now ready to preview the results before generating the legal description output file.
- If you have not already done so, click the Edit / Preview button in the Legal Description Writer command pane to display the Description Template Editor dialog.
- Click the Preview tab to preview the output of the legal descriptions that are generated based on settings and selections in the Legal Description Writer command pane and the selected legal description template.
If there are any warnings or errors resulting from the creation of any of the legal descriptions, a message is displayed at the top of the Preview tab indicating this is the case. The specifics of a warning or error are displayed with the individual description.
The text, including any warnings or errors, displays exactly as it will in the generated legal descriptions output file.
After previewing the output, do one of the following:
- If everything looks okay and you do not need to make any changes to the output, click OK to close the Description Template Editor dialog.
- If you want to make minor phrase changes to a small number of descriptions and you do not want to modify the template, type your changes directly on the Preview tab and click OK to close the Description Template Editor dialog. Your changes will be kept as long as the Legal Description Writer command pane remains open and you have not changed any settings.
- If you want to make temporary changes to the selected template (just for the generation of the legal descriptions output file), select the Edit tab and make changes as described in the next procedure, "To create and edit a legal description template." When you are done, verify your changes on the Preview tab and click OK to close the Description Template Editor dialog. In the Continue without Saving message dialog, click Yes. Your changes will be kept as long as the Legal Description Writer command pane remains open.
- If you want to make permanent changes to the selected template (other than the <Default> template, which is read-only), select the Edit tab and make changes as described in the next procedure, "To create and edit a legal description template." When you are done, verify your changes on the Preview tab and click Save to save your updates to the template. Then click OK to close the Description Template Editor dialog.
- If you want to save the selected template with a new name (for example, the <Default> template, which is read-only) and make changes to the new template, select the Edit tab and select Save As to save the template with a new name. Then make changes to the new template as described in the next procedure, "To create and edit a legal description template." When you are done, verify your changes on the Preview tab and click Save to save your updates to the new template. Then click OK to close the Description Template Editor dialog.
- In the Legal Description Writer command pane, select the appropriate Output option and click Apply to create the legal descriptions output file.
For additional instructions, see Create Legal Descriptions.
To create and edit a legal description template:
This procedure assumes that you have used the Legal Description Writer to select a legal description you want to either edit or save as a new template and edit.
- In the Legal Description Writer command pane, select the template you want to work with. Then, click the Edit / Preview button to display the Description Template Editor dialog.
- If you selected the read-only <Default> template, which is based on the DefaultLegalDescriptionTemplate.xml file installed with TBC, or any template that you cannot or do not want to change, click the Save As button and save the template file with a new name if you want to keep it. Otherwise, you can proceed to make temporary changes to the template for the purpose of creating a legal description output file, without actually saving the changes in the template.
If you select to save the template with a new name, the Legal Description Writer command pane is automatically updated to show the newly created template in the Template file field.
Note: If you selected the read-only <Default> template, the Save button is disabled. If you want to make permanent changes, you must save the template with a new name.
As described in Create Legal Descriptions, gaps in a Point of Commencement-to-Point of Beginning path will cause the path to fail when the legal description is generated, in effect losing the Point of Commencement starting point. The next step explains how to prevent such failures by specifying a path misclosure value.
- To choose various legal description options, select the Description Template node in the left pane on the Edit tab and, optionally, do any of the following:
- To change the path segment misclosure tolerance for the template, type a new gap length value in the GapTolerance field.
Gaps or line segments that are longer than this length value will cause a Point of Commencement-to-Point of Beginning path to fail.
Note: Although this feature can be helpful in dealing with very small measuring errors that are difficult to locate, entering too large of a gap value can result in incorrect descriptions without you knowing it. It is highly recommended that you inspect all of your linework for gaps and overlaps prior to creating a legal description. See Create Legal Descriptions for more information on working with gap tolerances.
- To ensure all upper case characters are used in the description, check the Force description to upper-case text check box.
- Select the appropriate Polarity Option.
Next, you will select settings that determine exactly how each unit value will be displayed when it is inserted in the legal description (for example, 12.35 meters, 01º14'04", 3.05 acres, and so on).
- To change the path segment misclosure tolerance for the template, type a new gap length value in the GapTolerance field.
- To change any of the unit formats in the template, select the appropriate format node in the left pane on the Edit tab. Then, in the right pane, either check the Use project settings check box or make changes in any of the fields as necessary.
If you select the Use project settings check box, all of the fields in the right pane are disabled and no edits can be made. The settings specified in the Unitssection of the Project Settings dialog are applied.
Note: See Unit Settings for descriptions of all of the unit formats available.
If you do not select the Use project settings check box, make changes to any of the fields as necessary. Some fields are drop-down lists that allow you to select the appropriate option (for example decimal precision and units of measurement). Other fields are text format fields that allow you to type in the text to be displayed with a value when it is included in a phrase in a legal description, and enter keywords, which represent actual values in the output file. Keywords can be entered into the text format fields at the cursor location by clicking the appropriate Keyword Insert button(s) located on the right side of the pane. The keywords available for selection are determined by the format type and settings. When typing text into the the text format field, you can use any formatting that is supported in a plain text (.txt) file, including capitalization, punctuation, spacing, common keyboard symbols.
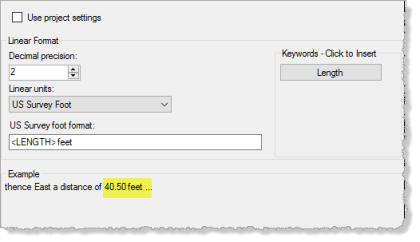
In the following example of a Linear Distance format, the Linear Format group box includes two fields showing the selected Decimal precision and Unit type to be used for linear values displayed in the legal description. The third field is a text format field that specifies exactly how distance values will be formated in the description phrase. The keyword <LENGTH> is inserted in the text format field to represent the actual length value that will be inserted at that location in the final legal description output. In the Example group box, the specified format (highlighted below) is displayed in a description phrase example.
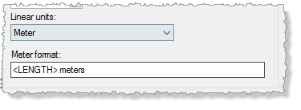
Note that text format fields and the available Keyword Insert buttons are dynamically updated as necessary based on selections in other fields. For example, if Meter was selected instead of US Survey Foot in the Linear units field, the US Survey foot format field would automatically change to Meter format and the field text would include "meters" instead of "feet." (Of course, you can edit the automatically-inserted text however you want.)
Notes:
- Angular values are used only when describing an arc length as a central angle in the legal description. Angular values for direction (for example, azimuth) can be different.
- Legal descriptions frequently use approximate directions such as "Northeast" or "Northeasterly" to describe directions that are not critical, such as the direction of arcs. You have the option of specifying two types of Approximate Directions formats to be used in description phrases: Approximate Directions 1 typically do not have the "erly’" suffix while Approximate Directions 2 typically do.You are now ready to review and/or edit the phrases that are available for use in the legal descriptions generated from the selected template. As with unit formats, each phrase is defined by a combination of text and keywords.
- To change any of the phrases in the template, select the appropriate Phrases node in the left pane on the Edit tab. Then, in the right pane, make changes as necessary by editing the text and inserting or removing Keywords.
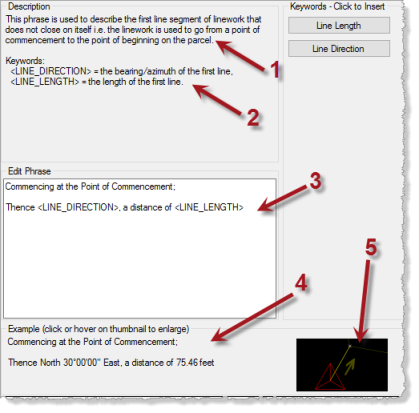
A Description of the selected phrase is displayed at the top of the pane (1 below), followed by definitions of each of the available Keywords (2). The Edit Phrase field allows you to view and edit the phrase (3). An example is displayed at the bottom of the pane (4). To see a graphic example of the situation in which the phrase would be used, hover your cursor over the image in the lower right corner of the frame to enlarge it (5).
- To see how phrases display with real data in a legal description output file, do either of the following:
- Select the Preview tab to see phrases as they are currently formatted in the selected legal description. Optionally, click the Enable Debugging check box located in the bottom left corner of the pane to display a link at the beginning of each phrase that, if clicked, takes you directly to the corresponding phrase pane on the Edit tab, enabling you to easily make changes to the phrase. The drawback to this option is that you may want to preview the formatted output for phrases that do not correspond to any of the linework in your project. In this case, the following option might be more appropriate.
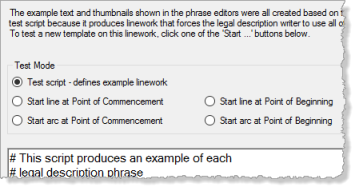
- Select the Phrases node in the left pane of Edit tab to display a Test Mode preview, which is based on a test COGO script that includes the linework necessary to implement every phrase available. This allows you to preview any phrase you may want to edit, even if you do not have the corresponding linework in your project. The Test Mode preview includes five options. The first option, Test script, allows you to see the COGO script used to generate all of the phrases. The other four options allow you to preview legal descriptions based on different starting scenarios. A link is displayed at the beginning of each phrase that, if clicked, takes you directly to the corresponding phrase pane on the Edit tab, allowing you to make changes to the phrase.
- When you are done previewing and editing the selected description template, do one of the following:
- If you want your changes to the selected template to be temporary (just for the generation of the legal descriptions output file), click OK to close the Description Template Editor dialog. In the Continue without Saving message dialog, click Yes. Your changes will be kept as long as the Legal Description Writer command pane remains open.
- If you want your changes to the selected template to be permanent (other than the <Default> template, which is read-only), click Save. Then click OK to close the Description Template Editor dialog.
You can now, if you want, create the legal description output file in the Legal Description Writer command pane based on the selected template.
