Specify Trench Side Slopes
Use the Side slope tab within the Trench Template Manager to specify the shape of a trench layback on the sides of a utility line and its utility nodes. You can also modify the specified settings for an existing trench line/trench node template. The shape can be confirmed in the dialog's preview pane.
The Side Slope tab's logic is based on corridor templates, but simplified to always be in cut and to limit your choices. The program's logic makes decisions based on a surface, so if different projects use different surface names, they will need to be updated to use the same template.
Almost always, you will slope storm sewers back from the bottom of the trench because they have large diameter pipes that are buried in shallow trenches. Sanitary sewer trench will typically be vertical because it is deep and a trench box will be inserted. Typically, cable networks will be installed with another type (and use their trench) or be installed shallow enough that no trench is required.
Conditional side slopes
You can specify that the geometry of side slopes be dependent on certain conditions, e.g., if the trench is less than 1m/4’ in depth, the sides will automatically tie to ground; otherwise, the sides extend vertically for 1m/4' and then tie to ground with a 1:1 slope. Here is another example in which the left tie slope uses a ratio of 1.5 to 1 at any depth.
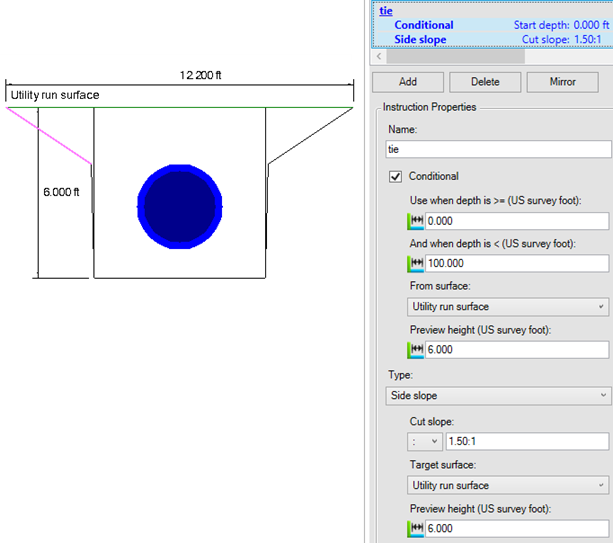
Figure: Sample conditional instruction for a utility trench template side slope
To create a trench side slope:
- In the explorer pane, select Node or Line.
- Click New or right-click and select New.
- In Side of Trench, select the side (in direction of ascending station) for which to create the template instruction (layback shape).
- Click Add.
- Specify options as described below.
- Click Save. The side slope's information displays in the list.
- To create additional instructions, click Add again and repeat the steps. Side slope instructions can be stacked.
To edit an existing trench side slope:
Once you save, you can edit the side slope configuration.
- In the explorer pane, expand Node or Line and select the template.
- Select a side slope instruction in the list (the corresponding geometry is selected in the preview).
- Edit the options and click Save.
- To remove a side slope instruction, select it in the list and click Delete.
Note: The middle pane of the Trench Template Manager shows a preview of the trench for a particular tab's options. See Preview Pane.
|
Side slope options |
|
| Instruction name |
Enter a name that will help you understand which part of the side slope the instruction affects. |
| Conditional |
Click Yes if you need the instruction to be based on the depth of the surface above it. If the first instruction is conditional, then subsequent instructions need to be conditional. If you select No, skip to a section below. Use when depth is >=
From surface - Select the surface (including stratum surfaces) from which to measure the depth referenced above. |
| Instruction type |
Instruction type (entry options):
|
| Instruction details - Side slope |
Cut slope - Click the icon to use % or ratio. Then enter the value. E.g., 1:1 (ratio of rise of 1 to run of 1). Note: Entering the correct slope ratio depends on your Slope ratio type setting (Rise to run or Run to rise) in Project Settings. Target surface - Select the surface to which the side slope instruction will 'tie'. Note: You can also select Utility run surface so that the surface will tie to the surface defined for any run. Preview height - Enter a specific height for each of your surfaces so that the side slopes will draw in relationship to these depths. |
| Instruction details - Horizontal/ vertical offset |
Enter a distance over (horizontal) and a distance up (vertical) from the current template node for specify the slope. |
| Instruction details - Horizontal offset with slope |
Enter a distance over (horizontal) and a slope percentage or ratio from the current template node for specify the slope.
|
