Manage Trench Templates
Use the Trench Template Manager command to define the cross-sectional shape of a trench template. The template manager enables you to create parametric template designs so that one template can be used for many sizes of utility lines; it will resize based on the dimensions of the pipe. Each tab in the manager defines a certain aspect of the trench. Each will show a slightly different picture based on what is being defined.
Note: For most projects, you can insert just one template at the starting station of a run and the entire run's trench will be modeled appropriately. You can also insert a template at a later station to skip a section of trench by changing that template's Trench template property to None to make it null from the insertion station until the next valid template.
The Trench Template Manager also allows you to rename, edit, and delete existing templates. In the manager:
- The template list shows the available templates, which you can select to copy, rename, edit, or delete.
- The preview pane shows a generalized graphic view of the selected trench that correspods with the properties on the selected tab. See help on each tab (links below) for information on what the preview pane shows. By tab, the preview shows:
Note: The color of the preview area is the same the program's background color, which is specified in Startup and Display Options(or can be toggled on the Status Bar when the manager is closed).
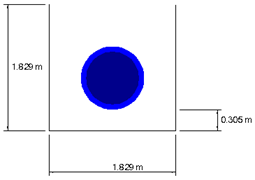
- Basic tab - Shows an outline of the primary utility line/pipe (outside and inside diameter) or node site improvement, lines representing the bottom of the trench, and left and right sides, and dimension arrows for the bottom of the trench and the left side of the trench and offset from bottom.
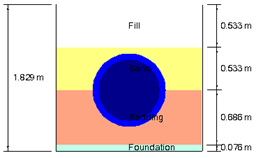
- Backfill tab - Shows material layers with areas colored by the material color, as well as layer thicknesses.
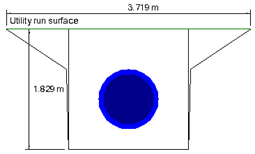
- Side Slopes tab - Shows side slope lines on each side of the template, the 'top' material extending up to the top of the side slopes, and dimensions on the side slopes and top of the trench.
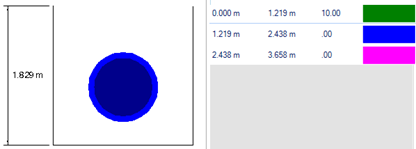
- Depth zones tab - Shows the trench depth using a user-defind preview height, and (in the tab) the depth of each defined zone.
- Basic tab - Shows an outline of the primary utility line/pipe (outside and inside diameter) or node site improvement, lines representing the bottom of the trench, and left and right sides, and dimension arrows for the bottom of the trench and the left side of the trench and offset from bottom.
- The tabs give you access to the settings for the selected template:
- Basic - Use this tab to specify the basic, cross-sectional shape of a trench along utility lines and around utility nodes.. See Specify a Basic Trench Shape.
- Backfill - Use this tab to set up backfill material layers for the template, generally filling up to a top of ground surface. Later, you can Run a Utility Takeoff Report to see the voulmes of each material for the runs in your network. See Specify Trench Backfill Material Layers.
- Side Slopes - Use this tab to specify the shape of the trench's sides and laybacks along a utility line and its nodes, as well as how it ties to the target ground surface. Conditional side slope instructions can also be created here. See Specify Trench Side Slopes.
- Depth Zones - Use this tab to specify depth zones and their associated costs for the template. Later, you can run a Utility Takeoff Report to calculate trench material volumes per depth zone. See Specify Trench Depth Zones.
To create a new trench template:
- Select Trench Template Manager in Utility > Trench.
- Click New beneath the templates list (initially empty).
- Click Rename, type a descriptive name, and press [Enter].
- Click in the template name, type a trench template name in the box, and press [Enter].
- In the Site improvement list, select a pipe type.
Note: You can change this type to see how the template will vary in response to a change in size.
- Click each of the tabs and fill in the required information.
- Click Close when you are done. Everything is saved as you work.
To rename a trench template:
- Select an existing trench template name and click Rename.
- Type the new name in the box, and press [Enter].
To edit a trench template:
- Select an existing trench template.
- Change the site improvement and/or setting on the tabs.
To duplicate a trench template:
- Select an existing trench template and click Copy.
- Click Yes to confirm.
- Click Rename, type the new name in the box, and press [Enter].
- Change the site improvement and/or setting on the tabs.
To delete a trench template:
- Select an existing trench template and click Delete.
- Click Yes to confirm.
Dependencies:
- When you edit the properties of any trench template, all instances of that type of trench in your model are updated with the changes.
