Add Rotation to a Tunnel
You can use the Edit Tunnel Rotation command to apply rotation to a tunnel at one or more stations along the tunnel corridor, as described in this topic.
Optionally, you can perform these edits using the Offsets/Rotations sub-tab on the Tunnel View tab with the tunnel you want to edit selected. The instructions in steps 3 through 6 below pertain to rotation edits on the Tunnel View tab as well. This is a useful option if you want to view your changes, as you make them, within the context of the entire tunnel.
Prerequisites:
Licensed module. See the Subscription Plans page. For a license matrix by command, see the License page in the TBC Community. Also see View and manage licensed features.
To edit tunnel rotation:
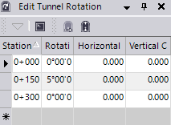
- Select Edit Tunnel Rotation in Tunnels > Edit to display the Edit Tunnel Rotation command pane.
- In the Tunnel drop-down list located at the bottom of the pane, select the tunnel design you want to rotate.
- To ensure the rotation is applied gradually through interpolation from one station to another (as opposed to an abrupt transition), enter the Station at which you want the interpolation to begin in the first row.
For example, you might enter a horizontal angle rotation value of 0º for a station that will gradually transition to the rotation value specified for the next specified station.
- Enter a Rotation value as an angle, slope percentage, or slope ratio (see note below).
Notes:
- When entering and displaying rotations for a tunnel shape, the default unit is horizontal angle, regardless of the display method specified in Project Setting > Units > Vertical Angle. Slope percentage and slope ratio are still valid entry methods, but they are converted to and displayed as horizontal angles in this command. The slope ratio order (H:V or V:H (run to rise or rise to run)) is controlled by Project Setting > Units > Vertical Angle >Slope ratio type.-The Project Settings > Vertical Angle Display setting Vertical distance is not supported in the Edit Tunnel Rotation command pane.
- Optionally, enter a Horizontal Center and/or Vertical Center distance value specifying the horizontal and/or vertical offset from the alignment centerline to use as a center point for the rotation.
- In subsequent rows, enter a rotation value for each subsequent station as necessary.
Your changes are saved whenever you select or tab onto a new row. A rotation persists until it is redefined for a subsequent station or until the end of the tunnel.
- When you are done, click Close.
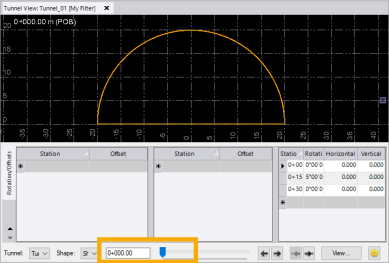
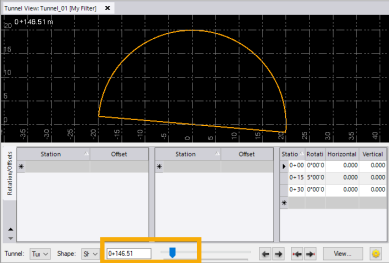
- Use the Tunnel View command (the Offsets/Rotations sub-tab is selected in the following example) to view the rotation of the tunnel along its corridor.