Create a Point Using the CAD Command Line
Use the Create Point command alias on the CAD Command Line to create a point in your project when, for example, you need to include a point for control or stakeout that was not observed in the field or otherwise recorded and imported in a points file. When you create a point, a coordinate object namedOffice entered is also created and is represented by a node that displays nested beneath the point node in the Project Explorer.
Prerequisites:
- License; See the Subscription Plans page. For a license matrix by command, see the License page in the TBC Community. Also see View and manage licensed features.
To create a point from the CAD Command Line:
- Press [F3] or click the
 icon on the Status Bar to open the CAD Command Line.
 - Type po or PO at the command prompt, and press [Enter].
- Skip the Layer, Color, and Line style lists below the command prompt; they do not apply to this operation.
- Enter a name (ID) for the point, and press [Enter].
- If needed, enter a feature code for the point, and press [Enter].
- Pick a coordinate for the point in a supported view, type an easting and then northing, or enter a keyword character to use another mode. The options are:
Coordinate type
- Grid - Enter G to create a point by entering X, Y, and Z grid coordinates (no global or local latitude and longitude coordinates).
- Local - Enter L to create a point by entering latitude, longitude, and ellipsoid height in the local datum assigned to a point.
- Global - Enter GL to create a point by entering latitude, longitude, and ellipsoid height in the global datum assigned to a point.
Point quality (planar)
 Control - Enter C to create a National Geodetic Survey (NGS) surveyed coordinate of the highest quality.
 Survey - Enter S to create a surveyed coordinate of the second highest quality.
 Mapping - Enter M to create a coordinate of low to average quality.
 Unknown - Enter UN to create a coordinate of the lowest or unverified quality.
Computation status
(determines whether the coordinate is used in computations)- Enabled - Enter E to include the coordinate when the project is computed.
- Disabled - Enter D to exclude the coordinate when the project is computed.
- Enabled as Check - Enter CH to use the coordinate only for error checking when there is no other way to compute the position for the point.
Auto-advance
- Elevation - Enter EL to skip entering the elevation and use the previously entered coordinate's elevation. When the elevation is undefined, the value is Undefined.
- Height - Enter HE to skip entering the HE and use the previously entered coordinate's elevation. When the elevation is undefined, the value is Undefined.
- Enable coordinate pickers - Click the
 coordinate picker icon to see/choose shortcuts to quickly calculate 3D coordinates using CoGo values. See Calculate Coordinates Using Coordinate Pickers.
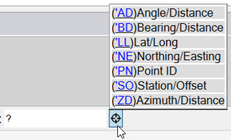
The command remembers the coordinate type and quality modes used the next time you run the command.
- Type an elevation for the point and press [Enter] to create the point.
If you have not yet specified a projection for your project, you are prompted to enter offsets for a false origin to define a projection.
- To create additonal points, press [Spacebar] to rerun the command.
