View Tunnel As-Built Points in the Tunnel View
Use the Tunnel View command to quickly view a graphical and tabular comparison between assigned as-built points and a tunnel design to determine overbreak and underbreak information for construction verification and quality control, similar to the information displayed in the Tunnel As-Built Report.
Prerequisites:
- Licensed module. See the Subscription Plans page. For a license matrix by command, see the License page in the TBC Community. Also see View and manage licensed features.
- You must assign imported as-built points to a tunnel before they can display in the Tunnel View.
To display tunnel as-built points in the Tunnel View:
- Do either of the following to open the Tunnel View tab:
- In the Project Explorer, right-click the tunnel you want to view and select Tunnel View.
- Select Tunnel View in Tunnels > View to display the Tunnel View tab. Then, in the Tunnel drop-down list located in the lower-left corner of the tab, select the tunnel you want to view.
- In the Shape drop-down list located on the lower-left side of the Tunnel View tab, select the shape to which the as-built points are assigned.
- Select the As-Built sub-tab located on the left side of the Tunnel View tab.
Since as-built points may be located anywhere along the tunnel's length, it would be easy to miss them using the navigation slider control or station selection buttons located at the bottom of the tab.
- To select a station at which as-built points are assigned, do either of the following:
- Enter the station in the Station field located at the bottom of the tab.
- Use the two As-Built Station arrow buttons located above the table view to move to the next or previous station to which as-built points have been assigned.
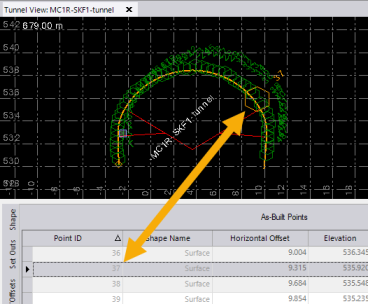
The selected tunnel design shape for the selected station displays in the graphic view, along with the assigned as-built points. Read-only data for each as-built point is displayed in the table.
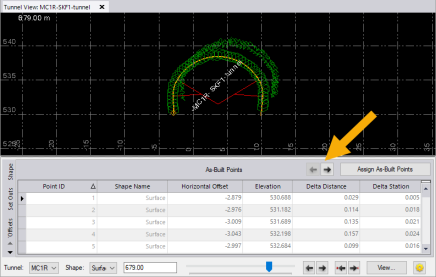
If you select a point in the table, the point is highlighted in the graphic view, and vice versa.
- To assign additional as-built points, click the Assign As-Built Points button.
- To view and, if necessary, change Project Settings that determine the display of as-built point data in the Tunnel View, click the Project Settings button
 located in the lower-right corner of the Tunnel View tab to display the Tunnel View pane in the Project Settings dialog.
In the Project Settings dialog, click any of the settings to see a description of its function. See View Settings for additional instructions.
