Extract Stockpiles from a Point Cloud and Compute Volumes
Use the Extract Stockpile command to quickly and easily extract one or more stockpiles from a point cloud, save them in your project, and compute their volumes. Simply click each stockpile you want to extract and specify a few parameters to automatically generate a boundary around it. The new (or a specified existing) boundary is then used to automatically extract the stockpile and calculate its base area, slope area, and volume.
Prerequisites:
See the Subscription Plans page. For a license matrix by command, see the License page in the TBC Community. Also see View and manage licensed features.
To extract stockpiles from a point cloud and compute volumes:
- In the 3D View or Plan View, display the scan points from which you want to extract stockpile features.
- Select Extract Stockpile in Point Clouds > Extraction to display the Extract Stockpile command pane.
- Optionally, click the Settings icon in the command pane toolbar to open the Extract Stockpile properties window in which you can do any of the following as necessary:
- Change the Grid size used for volume computations. By default, the grid size is set to 0.20 m.
- Select a different Text style for stockpile labels.
- Check the Use stockpile layer check box to display and save stockpile labels on the same layer as the layer selected for the stockpile in the Extract Stockpile command pane. This ensures that the stockpile and label are always displayed (or hidden) together. Optionally, select to display it on a different layer.
- In the Boundary Extraction box, do one of the following:
- If a boundary already exits for the stockpile you want to extract:
- Click the Select existing boundaries option.
- Click in the Select boundary field and then select the boundary you want to use.
- Proceed directly to step 10.
- If a boundary does not already exist for the stockpile you want to extract and you want to create it manually:
- Click the Select existing boundaries option.
- Click the Create Boundary button to display the Create Polygon command pane.
- Create a polygonal boundary around the stockpile you want to extract.
When you close the Create Polygon command pane, the new boundary is selected in the Extract Stockpile command pane.
- Proceed directly to step 10.
This is a good option if an automatic boundary extraction (see next bullet) fails and it would be easier to create a new boundary "from scratch" than edit the auto-extracted boundary.
- If a boundary does not already exist for the stockpile you want to extract and you want to have the command extract the boundary automatically, click the Extract new boundaries option and continue with step 5.
- If a boundary already exits for the stockpile you want to extract:
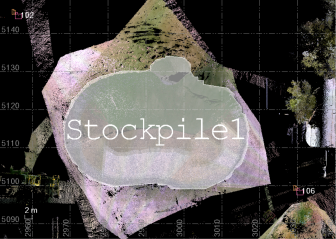
- Click in the Pick a point field and then click on a scan point in the stockpile you want to extract.
For best results, click on a main slope that is representative of the entire stockpile to capture its boundary. For example, if you select a scan point on local peak in a stockpile, the extracted boundary could be specific to the peak formation, not the entire stockpile.
- In the Max stockpile size drop-down list, select the appropriate maximum size option for the stockpile you want to extract, or enter a custom size.
This determines the area of the point cloud that will be searched forscan points included within the feature's border.
If you select or enter a size for the stockpile that is too large, the extracted boundary will be less detailed, resulting in less accurate results.
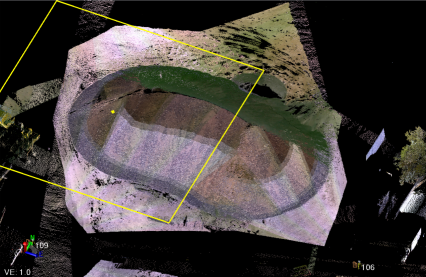
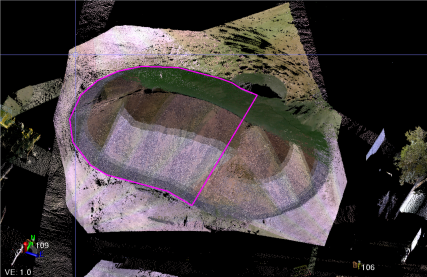
If you want to extract a stockpile with a higher detailed boundary, or if the stockpile is too elongated or too large, you can select or enter a size smaller than the size of the stockpile and perform multiple boundary extractions before extracting the stockpile by clicking a new location on the stockpile and clicking the Adjust Boundary button each time.
As an example, the next two images show a boundary created for only part of a stockpile using the Create Boundary button.
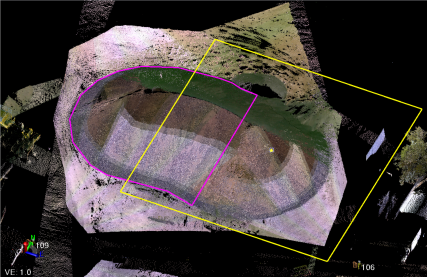
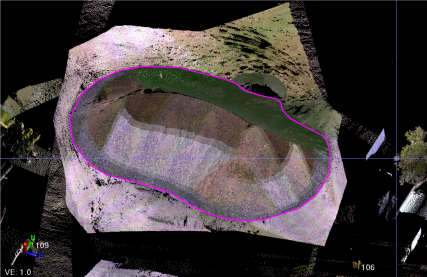
The next two images show a second point selection being made on the same stockpile. After clicking the Update Boundary button, a merged single boundary is drawn around the entire stockpile.
Note: If your point cloud is very sparse, select or enter a larger stockpile size. A smaller size with higher resolution might capture empty areas between points.
You can experiment with different stockpile sizes as described in step 9 to obtain the best results.
- In the Ground flatness threshold field, enter the surface height variation within which the surface is considered flat and whose scan points are not considered part of the stockpile.
A lower Ground flatness threshold provides stricter conditions for a scan point to be part of the stockpile, resulting in a more conservative (smaller) boundary. A higher Ground flatness threshold provides less strict conditions, resulting in less conservative (larger) boundary. You can experiment with different distances as described in step 9 to obtain the best results.
- Click the Extract Boundary button.
A polygonal border is automatically drawn around the perimeter of the stockpile.
- Do either of the following as appropriate:
- If the boundary does not appear to be accurate, do either of the following:
- Pick the same or a different location on the stockpile. Optionally, change the Max stockpile size and/or the Ground flatness threshold. Then click the Update boundary button.
- Select the Select existing boundaries option to create a new boundary manually.
- If the boundary appears to be accurate, do the following:
- In the Stockpile name field, enter a name for the new stockpile.
- In the Layer field, select the layer on which to display the new stockpile. Or, select <<New Layer>> to create a new one.
- If the boundary does not appear to be accurate, do either of the following:
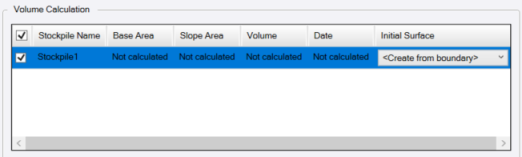
- Click the Add button to create the new stockpile feature and add it to the Volume Calculation table.
Optionally, if you want to edit the stockpile boundary, in the Plan View grab any of the polygon's handles and drag it to a new location as necessary (not available in the 3D View).

The stockpile area is automatically updated in the Volume Calculation table.
Note: If you have already calculated the stockpile volume as described in step 14, you will need to recalculate it based on any area changes due to boundary modifications.
- Optionally, in the Initial Surface column in the Volume Calculation table, select to use a different initial surface for the calculation than the default one automatically generated from the stockpile.
Note: The initial surface is calculated from a 3D boundary, so surface inclination/undulation are accounted for.
- Repeat these steps as necessary to extract additional stockpiles and add them to the Volume Calculation list.
- When you are done extracting stockpiles, ensure that all of the ones for which you want to compute volumes include a check mark in the Volume Calculation table.
Optionally, click the Remove Selected button to remove any selected stockpiles from the Volume Calculation list.
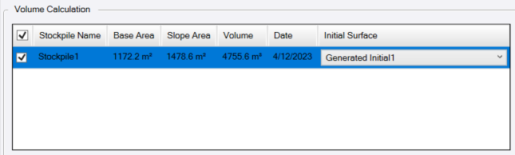
- When you are ready, click the Calculate Volume(s) button.
When the calculation is complete, the volume for each of the checked stockpiles is displayed in the Volume Calculation table.
Note: If you select a stockpile in the table, the stockpile is automatically selected in the Project Explorer and the view is centered on the selected stockpile for easier navigation.
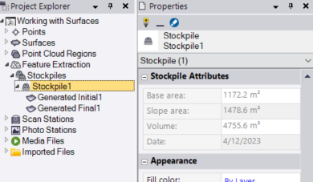
In the Project Explorer, each new stockpile and the surfaces used in its volume calculation are represented by nodes nested beneath Feature Extraction > Stockpiles. You can select any node to view or edit its properties.
- Optionally, do either or both of the following:
- Click the Create Report button to create a formatted report showing the same information that is displayed in the Volume Calculation table.
- Click the Export CSV button to create a simple CSV file showing the same information that is displayed in the Volume Calculation table.
 More instructions...