Area Site Improvement Options
Area site improvements are represented by closed lines within which an area can be calculated. A parking lot is an example of an area site improvement. In the Takeoff Report, both the area of each instance of the site improvement and the total area of all instances are reported. The cost of the cumulative total area is also calculated, if you provide unit cost data for each individual area.
|
Options |
|
| Name |
Type a descriptive name for the site improvement as you want it to appear in the Assign Site Improvement dialog and Takeoff Report. |
| (optional custom field) |
To include a user-defined field, visit Project Settings > Custom Fields > MSI Manager. See Custom Field Settings for details. |
| Measurement unit |
Select the appropriate square units, depending on whether you will purchase and build the improvement by English or metric area. Note: The units of measure that you specify overrides the corresponding setting in the Units section of Project Settings. |
| Material procurement unit cost |
This displays the total of the procurement unit cost of the man-made materials plus the borrow unit cost of the earthen materials (per cubic unit) multiplied by the thickness of each material's layer (defined in the Site improvement material layers at the bottom of the pane). Note: This program displays the currency symbol and format that you have set in Microsoft Windows® Regional and Language Options. The units and calculations, however, are not associated with a specific currency, so if a project is opened on a computer with different regional settings, those currency symbol and formats are used, but no conversion between currencies has been made. |
| Installation price |
Enter the cost (per area unit) that you will charge the customer to furnish, install, or otherwise construct every aspect of the site improvement, including all labor costs, profit, and other incidental costs that you expect to pay to have the site improvement constructed. |
| Bid unit price |
This displays the material procurement unit cost plus the installation price for each instance of the site improvement. This total, which can be reported in the Takeoff Report, is the cumulative price per site improvement of this type that you intend to include in your bid for the job. |
| Quantification basis |
Planimetric area - Select this to have the Plan View's (planimetric) area for the site improvement calculated and reported in the Takeoff Report. Surface area - Select this if the actual surface area (from the surface triangles) of the site improvement is important, such as for sodding on a slope. Surface area for the site improvement will be reported in the Takeoff Report. |
| Subgrade adjustment basis |
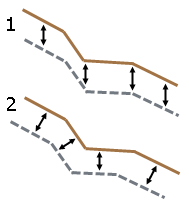
By vertical offset - Select this if the site improvement's top and bottom levels are to be vertically offset from each other (1 in the graphic below). By perpendicular offset - Select this if the site improvement's top and bottom levels are to be perpendicularly offset from each other (2 in the graphic below).
|
|
Color |
Select a color to help visually distinguish between site improvements that have the same top material. By default, area-based site improvements display in graphic views using the color of their top-most material (when color is set to By Layer). |
|
Calculate transitional depths... |
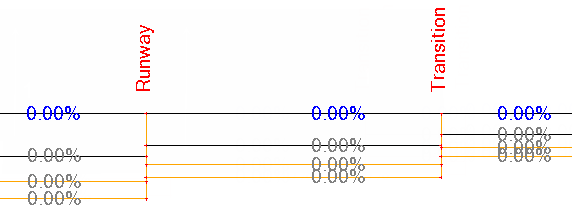
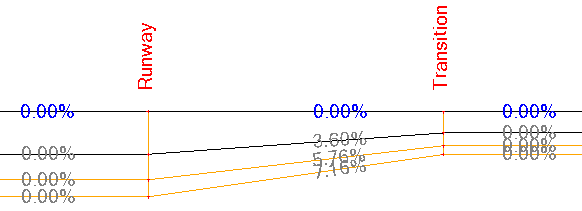
Check this box to overrride the default material thicknesses that you specified and use depths calculated from adjacent site improvements that have the same material layers stacked in the same order. Use this option when you need to smoothly transition material layer thicknesses between three side-by-side site improvements: from a site improvement on one side (1) of the current site improvement (2) to material layer thicknesses in a site improvement on the other side (3) of the current site improvement. Note: This option is not intended to support scenarios of only two adjacent site improvements, more than three adjacent site improvements, or when site improvements meet at a point rather than being side-by-side.
Cross-section of three improvements with material layers of the same materials, but different thicknesses
Cross-section of the same site improvements with transitional depths calculated for the middle site improvement based on the depths of the adjacent site improvements Figure: Area site improvement with transitional depths Note: There is a minimum thickness of 2.5 mm for a material layer to be used in transition calculations. If a material layer's thickness falls below this threshold, it is ignored. Consequently, you can transition between site improvements with unequal numbers of material layers if ignoring one material layer makes the number of material layers equal from site improvement to site improvement. |
| Site improvement material layers |
Enter the surface and subsurface materials needed to build the site improvement in the order they will be laid from top to bottom. Note: You can right-click in the left column to Insert or Delete a material layer row. Material - Click in the box and select a pre-defined material from the list. Layer name - This column is populated with the name of the material you specify. If needed, click in the box to edit the name. Thickness (small units) - Type the vertical height of the material level in the displayed units. Lifts - Click in this box to open the Edit Lifts dialog, where you can specify the number and thickness of sub-levels of material within the material layer you are defining. |