Create Selection Sets
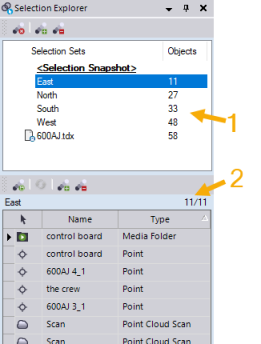
The Selection Explorer includes a Selection Sets list (1 below) that includes all of the selection sets in your project. Beneath it is a Selection Palette list (2 below) that includes all of the member objects included in the currently selected selection set(s). If the <Selection Snapshot> set is selected, any objects that are currently selected the project are included in the Selection Palette list.
Note the following:
- The selection sets you create, and those created from some types of imported files, also appear in the View Filter Manager. They can be used as starting points in creating view filters. See View Filter Manager Options for more information.
- Selection sets are created automatically when you import data containing scan station labels. See Work with Scan Station Labels and Selection Sets for more information.
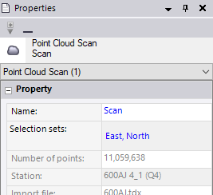
- If an object is a member of a selection set, the set's name is displayed in the editable Selection sets field in the object's Properties pane.
- Use Ctrl + click andto multi-select in any Selection Explorer list.
To create a new selection set using the Selection Explorer:
- Select Selection Explorer in Views > View.
- In the Selection Sets list, select <Selection Snapshot>.
If there are objects already displayed in the Selection Palette <Selection Snapshot> list you do not want to include in the new selection set, select them and click the Subtract objects from the Selection Palette icon in the Selection Palette toolbar.
- Use the Project Explorer or a graphic view to select the objects you want to include in the new selection set.
The selected objects are displayed in the Selection Palette <Selection Snapshot> list.
Note: If the list does not update automatically, click the Refresh icon in the Selection Palette tool bar.
- Click the Create a selection set icon in the Selection Palette tool bar.
- In the Save As dialog, enter a name for the new selection set and click OK.
The new selection set displays in the Selection Sets lists in the Selection Explorer and View Filter Manager and in the Properties pane for each of the selected objects.
To create a new selection set using the Properties pane:
You can use the Properties pane to create new selection sets for any of the following object types:
- Points
- Scans, scan stations, and scan observations
- Media files
- Use the Project Explorer or a graphic view to select one or more objects you want to add to a new selection set.
- Right-click and select Properties to display the Properties pane.
Selection sets of which the selected objects are members are displayed in the Selection sets field.
- Click in the Selection sets field to display the drop-down list, and select <New...>.
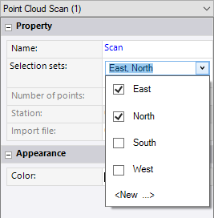
- In the Create new selection set dialog, type a name for the new selection set, and click OK.
The new selection set displays in the Selection Sets lists in the Selection Explorer and View Filter Manager and in the Properties pane for each of the selected objects.
To create a new selection set from one or more existing selection sets:
- Select Selection Explorer in Views > View.
- In the Selection Sets list, select the selection set(s) whose members you want to include in a new selection set.
The members of the selected selection set(s) display in the Selection Palette list.
- Click the Create a selection set icon on the Selection Palette toolbar.
- In the Save As dialog, enter a name for the new selection set and click .
The new selection set displays in the Selection Sets lists in the Selection Explorer and View Filter Manager and in the Properties pane for each of the selected objects.
