Understanding Area-based Site Improvements
Area-based site improvements represent 2D or 3D improvements occupying an area (and possibly depth and calculable volume) that a construction contractor builds out of material at a job site. Examples include building foundations, pavements, and areas of sodding. Area-based site improvements can be composed of one or more layers of material, each of a designated thickness. Designating an area as being occupied by a site improvements enables you to create various subgrade surfaces and report on their volumes in the Takeoff Report. The quantities associated with such site improvements can be calculated based on these factors:
|
|
|
| Quantification basis |
Planimetric area - Select this to have the Plan View's (planimetric) area for the site improvement calculated and reported in the Takeoff Report. Surface area - Select this if the actual surface area (from the surface triangles) of the site improvement is important, such as for sodding on a slope. Surface area for the site improvement will be reported in the Takeoff Report. |
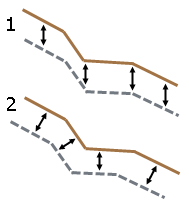
| Subgrade adjustment basis |
By vertical offset - Select this if the site improvement's top and bottom levels are to be vertically offset from each other (1 in the graphic below). By perpendicular offset - Select this if the site improvement's top and bottom levels are to be perpendicularly offset from each other (2 in the graphic below).
|
In Trimble Business Center, the presence of area-based site improvements can be defined in two ways using two different commands: Categorize Takeoff Layers and Assign Site Improvement Areas. Each of these ways has unique benefits, but in each case the area to be used by the site improvement needs to be encompassed by bounding lines (which can be either 2D or 3D).
Note: Regardless of the method you use to assign area based site improvements, it is critical that you confirm that the surface built from the Design surfaces is the intended surface. The gap tolerance used in the Assign Site Improvements command does not affect how the surface is built. Always check the limits of the surface as this will affect the volume calculations.
Associating a site improvement with a layer:
An area-based site improvement is automatically formed by a closed line when the line exists on a layer that has been categorized as Original, Design, Other, or Utilities, and the layer has been associated with a site improvement in the Categorize Takeoff Layers command. The occurrence of such site improvements are inferred by the settings and rules, and no new object is created. When the site improvement’s existence is automatically inferred in the above manner, you cannot use the Assign Site Improvements command (described below) to assign another site improvement to the closed line or remove it. In order to prevent the automatic assignment so that you can manually assign a site improvement, you must either break the line so that it is no longer closed or remove the association of that site improvement with that layer in the Categorize Takeoff Layers command.
In order to manually assign an area-based site improvement, the lines to be used as boundaries in enclosing its area must be on layers that have been categorized using either the Original, Design, Other, or Utilities takeoff category, and the layer must be designated (using the Categorize Takeoff Layers command) as an area-based site improvement boundary. If you designate a layer as one containing potential area-based site improvement boundaries, and associate a particular area-based site improvement with that layer, all closed lines found on that layer will bound automatically formed instances of that particular site improvement, whereas the remaining open lines will be considered as potential area-based site improvement boundaries within which you might be able to assign an area-based site improvement of any type.
To see how area-based site improvements can be associated with a layer, see the Categorize Takeoff Layers help topic. The benefits of using this method include:
- You can designate that every closed line found to exist on a particular layer be considered to be the boundary of a particular type of area-based site improvement.
- Numerous site improvements can be formed in this way, as you execute the Takeoff Report or the Validate Site Improvement Areas command.
Note: In a strict sense, the Categorize Takeoff Layers command does not actually 'create' site improvements. It allows you to produce the conditions by which the existence of site improvements can be inferred. The subtlety is that that command does not create or remove any particular individual site improvements (as the Assign Site Improvements command can); it only allows you to establish the set of conditions that the Takeoff Report can use in ascertaining the regions within which area-based site improvements can be presumed to exist.
Using the Assign Site Improvements command:
When you manually assign a site improvement using the Assign Site Improvements command, a site improvement object is created at the designated location, reflecting a specifically designated type of site improvement. These objects are graphically represented as a point and are created on a specific layer. You can edit the properties of the object and change the site improvement to which it applies, its layer and position. The areal limits of the related site improvement are controlled by the lines which have been found on layers specified in the Categorize Takeoff Layers command as being potential area-based site improvement boundaries, and validated by the Assign Site Improvements command as actual candidate boundaries, in consideration of the geometric relationship to the others, such that they combine to form enclosed areas. Each time the Assign Site Improvements command is run, the candidate boundary lines are highlighted and any automatically formed site improvement objects are determined. A change in the geometry of the line work changes the limits and potentially which site improvement is used to fill the specified area.
Note: This method enables you to consider the linework from multiple layers to determine the limits of multiple types of site improvements.
To see how to assign an area-based site improvement using this command, see the Assign Site Improvements help topic. The benefits of using this method include:
- When site improvements abut, you do not need to have coincidental boundaries. A single line can serve as a boundary between multiple adjoining site improvements. This can eliminate issues encountered by the alternative mechanism, caused by small gaps and overlaps in the individual boundaries of adjoining site improvements.
- You do not have to make a closed boundary line to contain each individual site improvements, but closed areas can still be used.
- You get immediate feedback, identification, and shading of the resulting area as you assign each improvement, while this command is running.
- If you make a mistake, you can undo it or later remove that site improvement and assign another to that same region.
- You can subsequently shade the original ground and finished design surfaces (by material) to reflect the color of the uppermost material layer associated with each area-based site improvement associated those surfaces. Note that this applies to all area-based site improvements, regardless of the mechanism by which they were formed.
- If you pick a location and there is no suitable enclosing area, you get a warning.
- When you assign a site improvement to any location within the plan view, it spreads until it encounters a line found on a layer that is categorized for takeoff and tagged as one containing potential boundaries, and a line verified by this command as one that is geometrically situated to serve as a region boundary. Minor drafting imperfections, such as gaps that keep multiple lines from forming the intended enclosed area, can be ignored via a tolerance, allowing the site improvement to be formed in spite of that issue. Additionally, such data imperfections can be exposed, allowing you to fix those problems as a part of a data preparation process.
This command cannot be used to remove a specific instance of a site improvement that was formed by merely associating the improvement with a layer using the Categorize Takeoff Layers command (described above).
Note: Disassociating a site improvement with a layer using the Categorize Takeoff Layers command , will eliminate every instance in which such a improvement has previously been formed, as the Build Takeoff Surfacescommand is once again executed.
The connection between the two commands:
If you assign site improvements using the Assign Site Improvements command (described above) you still must use the Categorize Takeoff Layers command to:
- Categorize the layers described below so they appear in response to your selection of a takeoff category in the Assign Site Improvement command.
- Identify the layers that contain lines you want to use as potential site improvement boundaries.
By doing so, this command will consider all lines found on those layers to be potential area-based site improvement boundaries. However, it will then evaluate those and highlight only those found, based on their geometry to be candidates which could be employed in forming enclosed areas.
Additional notes:
2D lines can be used as a boundary for a site improvement. When a 2D line crosses a design surface, the surface is modified (when the surface is built) to include the break described by the 2D line laid onto the 3D surface so that the material can be assigned to the additional indicated triangles.
When the takeoff surfaces are built, the site improvements are used to shade the surface. To see site improvement colors on a takeoff surface:
- Right-click the surface and select Properties from the context menu.
- For either the Plan View or 3D View, set Shading to By material.
- If you make any changes to the site improvement, rerun the Build Takeoff Surfaces command to see any changes in the shading.
Note: It is the surface that is being shaded, not the site improvement. Therefore, considering the finished design surface for example, even if a site improvement’s bounding line is on a layer categorized as influencing the formation of that surface, if the site improvement is formed by a 2D bounding line, any portion of it that extends beyond the finished design surface will not be shaded by the normal surface shading. Only the part that coincides with the surface can be acknowledged in the surface’s shading. However, while the Assign Site Improvements command is running (and Design category selected), the entirety of that site improvement that extends beyond the surface is shown shaded by that command. That is to say, the temporary shading that is in effect while that command operates is shading the site improvement, as opposed to the surface.
The Validate Site Improvement Areas command creates shaded polygon objects. These objects are 2D and do not shade the surface. They can extend the associated surface whereas the surface shading due to assigned site improvements does not.
