Create Curb, Gutter, and Roadmark Linestrings, Polygons, and Points from a Point Cloud
When creating linestrings, polygons, and CAD points, you can use the Point Cloud Smart Picking tool to roughly pick a scan point near a curb, gutter, or roadmark edge line and have the software automatically compute the best face-of-curb, gutter flowline, or roadmark edge point and display that point in an editable cross-section view. If you are creating a linestring or polygon, you can continue to roughly select each point necessary to, for example, define linework that accurately represents a gutter and can be properly feature coded and attributed for finished CAD deliverables. If you are creating standalone CAD points, you can use the points to, for example, create a best-fit line or measure offsets.
Prerequisites
See the Subscription Plans page. For a license matrix by command, see the License page in the TBC Community. Also see View and manage licensed features.
To create a curb, gutter, or roadmark linestring, polygon, or point from a point cloud:
- Do one of the following
- If you want to create a single- or multi-segmented open linestring, select Create Linestring in CAD > Lines. Complete the fields in the Create Linestring command pane as described in Linestring Options, then click OK. In the Edit Linestring command pane, select Coordinate in the Start Point group's Type drop-down list. Proceed to step 2.
- If you want to create a polygon (a closed multi-segmented linestring), select Create Polygon in CAD > Lines. Complete the fields in the Create Polygon command pane as described in Polygon Options, then click OK. In the Edit Linestring command pane, select Coordinate in the Start Point group's Type drop-down list. Proceed to step 2.
- If you want to create a point, select Create Point in Survey > COGO. Complete the fields in the Create Point command pane as described in Create and Edit Points. When you ready to select the coordinates for the point, proceed to step 2.
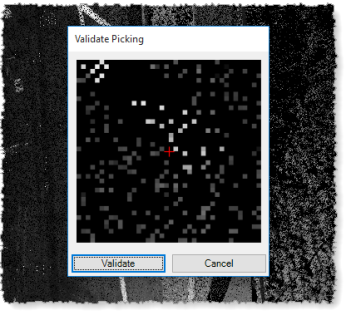
- Click the Point Cloud Smart Picking button located to the right of the Coordinate field (in the Edit Linestring pane) or Easting and Northing fields (in the Create Point pane) to display the Point Cloud Smart Picking window.
This window allows you to select the type of point picker you want to use to create the linestring, polygon, or point.
Note: The algorithm used for Point Cloud Smart Picking is based on the intensity values of the scan points. To avoid inconsistencies or unexpected results, be sure the point cloud region rendering mode is set to Gray-Scale Intensity or Color-Coded Intensity prior to using Point Cloud Smart Picking.
- Default - Select this option to use the default aperture-based picker used elsewhere in the software. You will not use this option to create a curb-, gutter-, or roadmark-based linestring, polygon, or point.
- Face of curb - Select this option to pick a point on the top of the face of a curb in a point cloud.
Start by picking a point in a point cloud roughly near the curb for which you want to create the linestring, polygon, or point. The Picking Preview window displays showing a cross-section view of the curb and the automatically selected pick location.
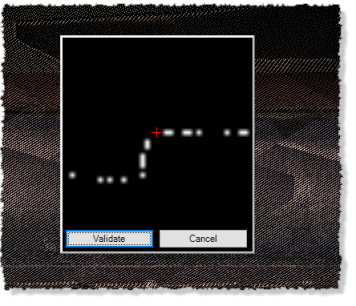
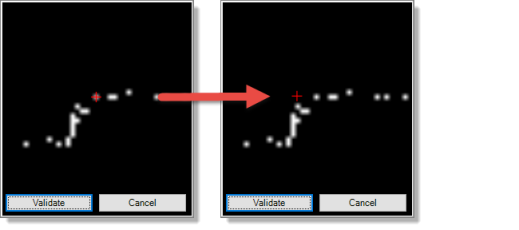
If necessary, click a different location in the Picking Preview window to fine-tune the location of the point on the top of the face of a curb. (You do not have to click a displayed point.) When you are ready, click the Validate button., or press the Enter key. Proceed to step 3.
- Gutter - Select this option to pick a point on a gutter flowline in a point cloud.
Start by picking a point in a point cloud roughly near the gutter flowline for which you want to create the linestring, polygon, or point. The Picking Preview window displays showing a cross-section view of the gutter and the automatically selected pick location.
If necessary, click a different location in the Picking Preview window to fine-tune the location of the point in the gutter flowline. (You do not have to pick a displayed point.) When you are ready, click the Validate button, or press the Enter key. Proceed to step 3.
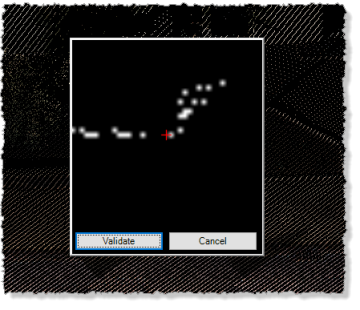
- Roadmark - Select this option to pick a point on a roadmark edge line in a point cloud.
Start by picking a point in a point cloud roughly near the roadmark edge line for which you want to create the linestring, polygon, or point. The Picking Preview window displays showing an overhead view of the roadmark edge line and the automatically selected pick location.
If necessary, click a different location in the Picking Preview window to fine-tune the location of the point on the roadmark edge line. (You do not have to pick a displayed point.) When you are ready, click the Validate button, or press the Enter key. Proceed to step 3.
- Do one of the following:
- If you are creating a linestring or polygon, repeat this procedure to select each subsequent point necessary to define the linestring. (For additional instructions, see Create a Linestring or Create a Polygon.) When you are done, right-click in the 3D View and select [New] to save your changes and create a new linestring, or select [Close] to save your changes and close the Edit Linestring command pane. (Or click the New or Close button in the command pane.)
- If you are creating a point, complete the rest of the fields in the Create Point command pane as necessary. When you are done, right-click in the 3D View and select [Add] to save your changes and create a new point, or select [Close] to save your changes and close the Create Point command pane. (Or click the Add or Close button in the command pane.)
