Create a Tunnel Shape from a CAD Object
Use the Create Tunnel Shape from CAD command to create a tunnel shape from a CAD object (for example, a CAD line, rectangle, or circle) that you imported or created in your project. The tunnel shape defines tunnel cross-section geometry that can be added to a tunnel template that, in turn, can be applied at any tunnel corridor station to define the shape of the tunnel at that station. If necessary, the tunnel shape can be edited in the Shape Editor to add to or modify its linework.
 To ensure smooth shape transitions through interpolation...
Prerequisites:
- Licensed module. See the Subscription Plans page. For a license matrix by command, see the License page in the TBC Community. Also see View and manage licensed features.
To create a tunnel shape from a CAD object:
- Select Create Tunnel Shape from CAD in Tunnels > Create to display the Create Tunnel Shape from CAD command pane.
- Enter a Name for the new tunnel shape.
- Select the Tunnel and tunnel shape Template to which you want to assign the new shape.
The new shape will be applied to the tunnel at one or more stations specified for the tunnel shape template.
- Click in the Line field and then select in a graphic view the CAD object you want to use to create the new tunnel shape.
- With your cursor in the Base location field, click a location on or near the CAD object you want to use indicating where the object will be located in relation to the tunnel alignment (that is, where the alignment will intersect the object.).
This is the equivalent of 0,0 in the Shape Editor.

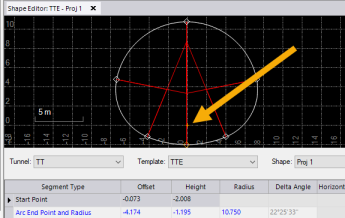
Resulting shape displayed in the Shape Editor:
- Optionally, select a Scale to apply to the CAD object before it is used to create the tunnel shape.
- Click Apply to create the new shape and keep the command pane open, or click OK to create the new shape and close the command pane.
You can now create a designed tunnel mesh and view the shape in the 3D View.
