Create Superelevation Instructions
The Superelevation instruction type applies a predefined superelevation to selected nodes in a corridor template. "Superelevation" is the banking of a road along a horizontal curve so motorists can safely and comfortably maneuver the curve at reasonable speeds. For more information, see Understanding Superelevations.
Before you can create a Superelevation instruction, you must create a superelevation for the associated horizontal alignment. For instructions, see Create and Edit Superelevations.
To create a new Superelevation template instruction:
- Display the Edit Corridor Template command pane for the template for which you want to create a new Superelevation instruction as described in Create Corridor Template Instructions.
- If instructions are displayed in the Instructions list, do the following. Otherwise, proceed to step 3.
- In the Instructions list, select the instruction after or before which you want to insert the new instruction.
- Click the Add Instruction button located at the top of the Edit Corridor Template command pane.
- In the Instruction Type drop-down list, select Superelevation.
- In the Crown node drop-down list, select the node that represents the crown for the pavement and from which you want superelevated slopes to be calculated. Or, select the crown node in the template view.
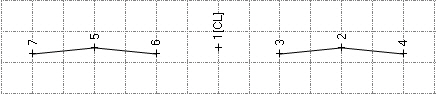
This would typically be the centerline node for an undivided highway. However, if you are working with a divided highway as shown in the following example, calculating superelevated slopes from the centerline node will provided unexpected results. Instead, you should calculate slopes from the crown node for each direction of the highway. For example, if you are applying superelevation to nodes 2, 3, and 4 in the following corridor template, you would select node 2 to be the crown node.
- In the Pivot node drop-down list, select the node about which you want the superelevation to pivot. Or, select the node in the template view.
This would typically be the centerline node or one of the edge-of-pavement nodes. You can also select <Inside Node> or <Outside Node> if the superelevation is being applied to a reverse curve. This would cause the superelevation to pivot around the inner- or outer-most node in the Superelevation nodes list.
- Do one or both of the following to select the nodes to which the superelevation will be applied:
- Select a node in the Select node drop-down list and click the Add button to add your selection to the Selected nodes list. Repeat as necessary to add more nodes to the list.
- Click in the Select node drop-down list to highlight it. Then, in the template view, select the node you want to add to the Selected nodes list. Repeat as necessary to add more nodes to the list.
Note: The node you selected in the Pivot node drop-down list is automatically added to the Selected nodes list.
Note: To avoid unexpected results, you should insert a superelevation instruction in the Instructions list immediately following the nodes selected to be superelevated.
- Do one of the following:
- Click the Add After buttonto insert the new instruction after the selected instruction in the Instructions list.
- Click the Add Before buttonto insert the new instruction before the selected instruction in the Instructions list.
Note: If there are no instructions in the Instructions list, click either button to insert the new instruction as the first instruction in the list.
The new instruction is inserted into the Instruction list. Any changes to the template are displayed in the template view. The fields are cleared and you can repeat this procedure to create and add more instructions to the template.
