Create Conditional Instructions
The Conditional instruction type enables you to apply instructions based on conditions in a corridor template so that the instructions are only created in specific situations, e.g., if a road edge node in a corridor template is below rock, then use one side slope instruction to create a cut slope of 2:1 and another side slope instruction (starting where the rock cut ends) to create a normal ground cut slope of 1:2.
Note: To avoid having to create a long list of conditional statements for a side slope, you can also control side slope segments by creating a table of depth and slope values for the side slope in a corridor template. Select Corridor Template Editor > Side Slope instruction type > Cut slope list > Slope by depth table. See Create Side Slope Instructions for more information.
Conditional instructions can be based on these conditions:
- Node is below surface
- Node is above surface
- Node distance from surface
- Horizontal distance between points
- Vertical distance between points
- 3D distance between points
These options give you vertical and horizontal conditions in which to apply subseqent instructions.
Note: There is no gradual interpolation (smooth transition) between regular templates and templates based on conditional instructions; the abruptness of the transition depends on the Maximum sampling distancefor corridor as set in Project Settings > Computations > Corridor.
Prerequisites:
- Licensed module; See the Subscription Plans page. For a license matrix by command, see the License page in the TBC Community. Also see View and manage licensed features.
- Corridor
- Reference surface or points
To create a conditional instruction:
- Display the Edit Corridor Template command pane for the template for which you want to create a new conditional instruction as described in Create Corridor Template Instructions.
- If instructions are displayed in the Instructions list, do the following. Otherwise, proceed to step 3.
- In the Instructions list, select the instruction after or before which you want to insert the new instruction.
- Click the Add Instruction button located at the top of the Edit Corridor Template command pane.
- In the Instruction Type drop-down list, select Conditional.
- In the Description box, enter additional information to help you identify the reason for the conditional instruction.
- Select an Boolean option in the Condition list:
- if - Select this to create the instructions below it if a condition is true. Then use the steps below to define the condition under which this instruction will be applied until there is a new else or end conditional instruction.
- else if - Select this to create the instruction if a first condition is false and a second condition is true.
- else - Select this to create a different instruction when the previous if condition is false. This is basically enables you to add an "otherwise" condition after if conditional instructions.
- end - Select this to create an instruction that stops previously applied if or else conditional instruction after this point in a set of template instructions. Instructions after an end conditional instruction are applied normally.
- Select a condition:
- Node is above surface
- Node is below surface
- Node’s vertical offset from surface
- Node’s distance from node
- Node’s horizontal distance from node
- Node’s vertical distance from node
- If applicable, use the Values boxes to specify the lower and upper limits of a range for offset and distance-based conditions. The upper value must be smaller than the lower value.
Note: Use negative values to specify values that are vertically offset below/a vertical distance below or to the left of the related surface/node. For example, if you want a condition to apply if a node's vertical offset is in the range of 2.0 m either above or below a surface, you would enter >= -2.0 and <= 2.0.
- Click the Add buttonto insert the conditional instruction after the selected instruction in the Instructions list.
- Add the instructions that you want to create only under the specified conditions. This is basically the "then" statement that refers to the "if" statement in the conditional instruction.
- If applicable, use the end conditional instruction type to resume adding regular, unconditional instructions.
Note: You can double-click a conditional instruction to collapse/expand the instructions within it.
Note: You can nest conditional instructions (from top to bottom) in the list, e.g., you can have an if instruction with child else and if instructions beneath it before an end instruction.
Scenario:
- If you mirror conditional instructions, there must be an equal number of corresponding if and end conditional instructions on either side of the template.
Example:
The most common cases in which to use conditional instructions are:
- when the side slope's angle is dependent upon the depth of a node in an area of cut
- when the template is conditional based on the material a node is within
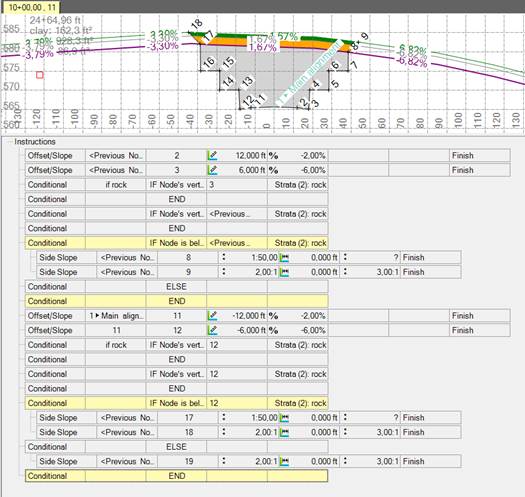
Here is one example. Starting with this template,
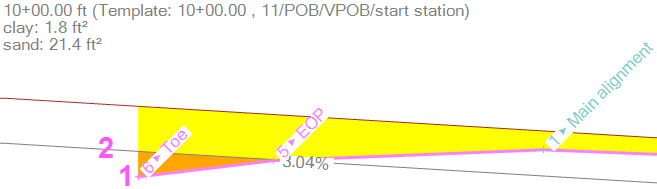
A conditional instruction was added:
- Condition: if node is below surface
- Node: 6> Toe (1 in the image above)
- Surface: Strata: clay (2 in the image above)
Next, a regular instruction was added:
- Type: Side slope
- From node: 6 > Toe
- Target surface: Original ground
- Cut slope: 2:1
- Cut ditch width: 2
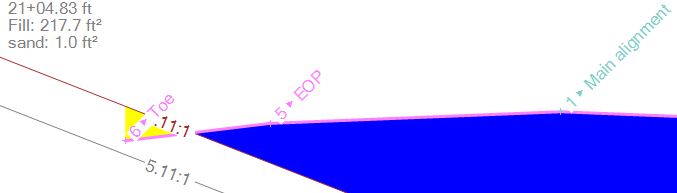
Because the condition is true (node 6 is below the top of the orange clay stratum), the side slope is drawn at this station (3 in the image below):

Further down the corridor, where node 6 is nor below clay, no side slope is created.