Create a Corridor Interchange
Use the Create Interchange command to build a multi-level corridor junction (interchange) with ramps for the transitions between a main highway alignment and another road alignment that crosses above or below the first alignment. You can also create ramps manually using the Create Ramp command.
Prerequisites:
- License; See the Subscription Plans page. For a license matrix by command, see the License page in the TBC Community. Also see View and manage licensed features.
- Two alignments that cross planimetrically, but do not intersect at grade;
Note: To make it possible to pass under, the overpass elevation difference should be 7 - 14 m (23 - 46'). See/set the valid range in Project Settings > Computations > Road Intersection > Min/Max elevation of highway overpass.
Before you create an interchange:
- Select Project Settings in the Quick Access Toolbar.
- Review and modify these related settings as needed:
- Units > Station
- View > Corridor Template View
- View > Station Navigation
- View > Superelevation Diagram
- Computations > Road Intersection
- Computations > Corridor
Note: Press [F1] for help on any of the settings when you are in the dialog.
- Click OK.
To access the command:
- Select Create Interchange in Corridors > Infrastructure.
- Right-click an alignment in the Project Explorer or a graphic view, and select Create Interchange.
To create a corridor interchange:
- From the Main highway box, pick an alignment (of a major road) in the Plan View.
- From the Crossing road box, pick an alignment (of a lesser road) that passes above or below the selected main highway.
- In the Name box, type a unique name for the junction as you want it to appear in the Project Explorer and Selection Explorer.
- In the Interchange type list, select an option:
Note: It is not possible to change the type after you create the interchange. If you want to use a different type, you must delete the interchange and create a new one.
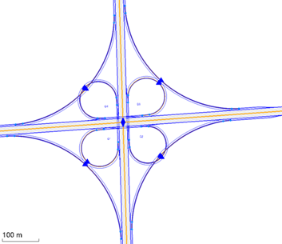
- Cloverleaf
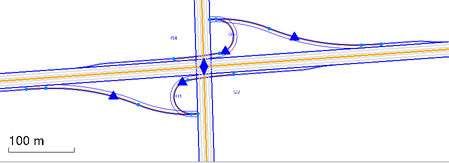
- Partial cloverleaf
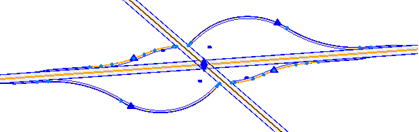
- Diamond
- Cloverleaf
- To use interchange parameters from a previously saved intersection template, check the Load properties from template box.
By default, the Intersection template list is populated with names of files in this folder: C:\ProgramData\Trimble\IntersectionTemplates.
Select a template in the list or click the Browse button, browse to the template file, and click Open.
- Click Apply to create the interchange and then Close when you are done. The interchange is created and appears in graphic views, and the Project Explorer (under Road Intersections). The interchange object is represented by a blue diamond at the planimetric intersection of the two alignments.
To model the interchange, the ramps, road shoulders, and other derived lines are also drawn for the portion of the corridor within the interchange. If the interchange connects to existing corridors, the interchange geometry is adjusted to match the existing corridor geometry. In addition, a surface with the same name as the interchange is created.
To edit an interchange:
- Select the blue diamond at the center of the interchange, and press [F11] to change any of the interchange properties.
Dependencies:
- Interchange geometry is dependent upon the associated corridors or alignments from which it is built; if that geometry changes, the interchange will dynamically update in response.
Scenarios:
- If there is existing geometry at the location of the intersection, you will need to remove it manually; the interchange will be created coincident to it.
