Create a Surface for Overexcavation
Use the Overexcavation command to create a surface to represent the result of excavation within areas that need to be cut below an intended finished or subgrade surface (overexcavated). This is typically done to accommodate layered replacement and compaction of the excavated material in controlled lifts as needed to achieve a specified material density to a designated depth.
Once created, an overexcavation surface is like any other: the primary use is for calculating takeoff volumes, but you can also send it to the field for use on earthwork machines.
For more information, see the document entitled Modeling Overexcavation Requirements in the Community.
Note: Due to the expectation that overexcavated material will be reused in the areas from which it was excavated, this command has no affect on the total earthwork volume of borrow materials, as calculated in the Mass Haul Analysis section of the Takeoff Report. The cut and fill volumes due to overexcavation are, however, reported separately in the report as an acknowledgement of that work. Any reduction in volume due to compaction after replacement is considered nominal and is therefore not calculated.
Prerequisites:
- Licensed module; See the Subscription Plans page. For a license matrix by command, see the License page in the TBC Community. Also see View and manage licensed features.
- One or more closed boundary lines that encompass the areas to overexcavate
- Takeoff surfaces or an existing ground and finished design surface
To access the command:
- Select Overexcavation in Takeoff > Takeoff.
Options:
- The toolbar at the top of the pane includes icon shortcuts to helpful commands including Selection Explorer, Join Lines, Shrink Wrap, Define Strata, and Build Takeoff Surfaces.
- Use Takeoff Report surfaces - Check this box to use the existing and finished design surfaces as set for the current Takeoff Report.
When the box is unchecked, the Existing and Finished design surface list appear, allowing you to choose any two different surfaces as the limits of the overexcavation area.
Note: A different surface must be selected for each, and you cannot select either isopach or overexcavation surfaces.
- Overexcavation surface - Select an existing overexcavation surface to modify or select <New> to create a new one.
In the Overexcavation group, select the closed lines that outline (horizontally) each overexcavation pit. Also specify the values for each wall profile.
- Template - If you have created one or more overexcavation templates, you can select one here to define the profile of the walls. Select <New> to launch the Overexcavation Template Manager to create or edit a template. This enables you to create a different profile on each overexcavation hole. Only one template can be applied to an overexcavation boundary/closed shape. To use the simple overex surface with min and max depths, leave Template set to None. If you already have overexcavation surfaces in your projects, they will default to Template = None until you specify otherwise.
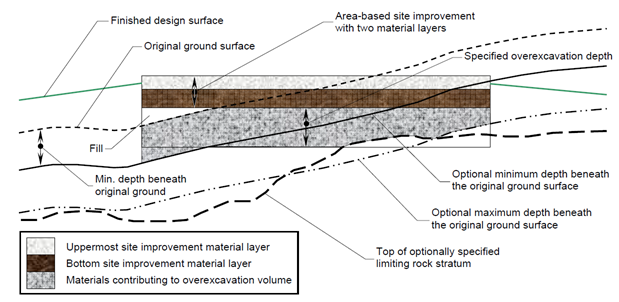
- Specified overexcavation - Enter the distance below the lowest finished design surface that you need to overexcavate, unless overridden by the other considerations noted below.
Note: You might have several finished design surfaces based on subgrades or topsoil removal. These might include Finished design, FD with subgrades adjusted, FD with topsoil absent (& subgrades adjusted, for example. The depth you specify is from the deepest one of the finished design surfaces, as computed by the Build Takeoff Surfaces command.
- Minimum beneath original ground - In this distance control, specify the minimum distance below the Original ground surface that you need to overexcavate (as distinguished from the excavation that occurs in normal mass earthworks).
Enter the minimum depth that the overexcavation hole will penetrate. Any vertical wall intersecting the daylight surface (that is less than this distance) will be ignored. This value can be modified on a per-hole basis after the surface is generated. - Selection - Select one or more closed lines to use as the boundaries (horizontal edges) of the overexcavation.
Tip: If the overexcavation area requires a horizontal offset from the closed line you are using as the boundary, use the Offset Line command to create a new closed line for the overexcavation boundary or add a width instruction to your template if you are using one.
- Add/Update - Add any currently selected closed lines objects that are not already included in the selection. Or, select a line that is already one of the overexcavation boundaries, edit its Specified Overexcavation and Minimum beneath original ground values, and click this to update it. Whenever you add a new boundary. it uses the current values shown.
- Remove - Remove any selected closed lines from the current defined set.
(status box) - an open region below the region will report on what happened during the last press of the ‘Add’ or ‘Remove’ buttons.
In the Limits group, define how deep the overexcavation can go.
- Maximum depth beneath original ground - Specify the deepest distance beneath the Original ground surface that can be overexcavated. The maximum depth of the well from the daylight surface will not exceed this value.
- Limit to top of stratum - Check this box and select a stratum to specify that the excavation can never go beneath the top of a certain stratum of earthen material. If enabled, the overexcavation well will not penetrate the specified stratum layer.
If you checked the Limit to top of stratum box, select a material stratum layer as the lower limit.
- OK - Generate the new overexcavation surface and close the command. A new surface will have a type of Overexcavation.
If you create multiple overexcavation surfaces, specify which (if any) to use in the Takeoff Report by selecting it, pressing [F11] to open the Properties pane, and setting Active overexcavation to Yes. Zero or one can overexcavation surface can be active at a time.Note that:
- Add/Update and Remove relate only to settings for selected boundary lines in the Overexcavation section.
- OK relates only to settings in the General and Limits sections (an entire overexcavation surface).
Tip: Use the Surface Slicer View to check the profile of the Overexcavation surface.
- Cancel - Closes the command without creating an overexcavation surface.
Edit an overexcavation surface:
- When you create an overexcavation surface, its members (the closed boundaries) are automatically added to a selection set of the same name. Right-click one of the overexcavation members in the Selection Explorer and select Properties to edit the Active overexcavation, Overexcavation (specified), and Overexcavation (minimum) properties. If you have multiple overexcavation boundaries for the same surface, they can each have different values. Editing the overexcavation surface properties will not have the same effect.
Dependencies:
- The Overexcavation surface is dependent on the areas, depths and limits you define, but the surface does not update until you build the surface using the Build Takeoff Surfaces command.
