User Interface
The Trimble Perspective software user interface looks typically as shown below. It is a good idea to familiarize yourself with it, and all of the components that are described hereafter.
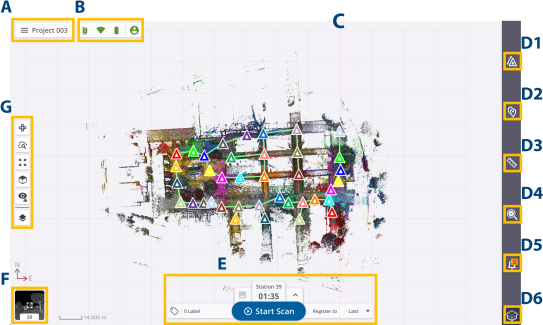
A - MENU / PROJECT NAME AREA is where the current project name displays and where you can access the Menu panel.
B - SCANNER STATUS AREA is where you can visually check the connection status of the scanner, the type of connection set between the scanner and the controller, the battery level in the scanner, and the atmospheric correction applied*. Click inside this area to open a window and access more detailed information such as the scanner name and the reference number, the space left in the memory card, the Wi-Fi settings, the atmospheric correction value*, and the power level left in the scanner. From this new area, you can access to the Connections panel (see Connect to a Scanner), to the Settings pages (see Settings), to the Wi-Fi Advanced Settings panel (see Define Advanced Wi-Fi Settings) and to the Configure Atmospheric Correction panel* (see Apply Atmospheric Corrections).
C - VIEW AREA is where the collected data displays. See Views.
D - TOOLS AREA is where you can access the available tools.
- D1 -
 Stations List opens a panel from which you access the captured data to view detailed information, run additional task(s). See Stations List Panel.
 - D2 -
 Points Tool enables you to add and edit annotations and precision points. See Points Tool.
 - D3 -
 Measurement Tool enables you to measure position(s), distance(s) and area(s) or a surface. See Measurement Tool.
 - D4 -
 Inspection Tool enables to evaluate the evenness and levelness of a floor surface based on the collected point cloud data of the floor surface. See Inspection Tool.
 - D5 -
 Notifications List opens a panel from which you access all notifications popped-up during a working session. A notification can state the connection status of the scanner, a warning on the battery charge level in the scanner, one of the numerous steps the scanner executes, etc. See Notifications List Panel.
 - D6 -
 Limit Box enables you to clip and export a region on the displayed point cloud to the LAS format. See Limit Box.
E - SCAN & IMAGE PARAMETERS AREA is where you access the acquisition parameters, launch a scan, and / or add labels. It is available at all times when the software opens and the controller is connected to the scanner.
F - VIEW TOGGLE AREA is a shortcut to switch from the current view to another view.
G - DISPLAY SETTING S AREA is where you can access the display, rendering and navigation options. It is available at all times. The number of options varies depending on the view.
(*) Only for an X9 and when the Atmospheric Corrections option has been turned ON.
