Connect to a Scanner
Connect a controller to a scanner:
-
 &
&  - With Wi-Fi or with the provided USB 2.0 cable. Only one connection type can be used at a time. The USB cable is automatically selected as the primary connection type.
 After powering a scanner on, the five LEDs at its base blink orange (the scanner is initializing) and become:
-
White when no valid license has been found. Perspective displays a warning and prompts you to purchase a license.
-
Green when a valid license has been found and the scanner is ready to go on.
For the first connection to the scanner, Perspective prompts you to set a Wi-Fi password (see Set Wi-Fi Password). Once set, the next time you reconnect to the scanner with:
-
The same controller, the connection is automatic and does not require entering the Wi-Fi password.
-
A different controller, enter the Wi-Fi password that has been set to the scanner.
If you know the Wi-Fi password, enter it and tap Connect.
If you do not know the Wi-Fi password or if you forgot it, reset it (see Reset Wi-Fi Password).
-
-
 - With Wi-Fi or with the provided RJ45 Ethernet cable. Only one connection type can be used at a time. The RJ45 Ethernet cable is automatically selected as the primary connection type.
After powering the scanner on, wait until it is ready. This can take about 20 seconds. Do not touch the screen in the meanwhile. The start-up is complete after an audible sound and the menu appears on the display. Refer to the Trimble X12 3D Laser Scanner User Guide for more information.
At the first power-up of the scanner, you are prompted to enter a Wi-Fi password on the on-board user interface for security. For the first Wi-Fi connection to the scanner, Perspective prompts to enter the Wi-Fi password. The next time you reconnect to the scanner with the Wi-Fi using:
-
With the same controller, the connection is automatic and does not require the Wi-Fi password.
-
A different controller, enter the Wi-Fi password that has been set to the scanner.
To find out the Wi-Fi password that has been set to the scanner, first tap
 Settings > Connections > Edit Settings from the on-board application of the scanner. Then, tap in the Wi-Fi password field to display the Wi-Fi password screen. Finally, tap
  .
. -
-
Tap
 to open the Connections panel.
When the Wi-Fi switch is Off in Windows settings, Trimble Perspective can't access the Wi-Fi interface control panel and displays a message asking to turn the option On.
With Windows 11 24H2, when Location Services are turned off, Trimble Perspective can't access your device's location or Wi-Fi network information. It will display a message asking you to enable Location Services. You can tap the message to open the Privacy & Security > Location page and turn Location Services on.
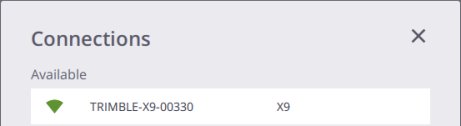
All the scanners in the vicinity of the controller appear in the Available list. If you have previously connected to a scanner, it is listed above in a separate list titled Previously Connected.
-
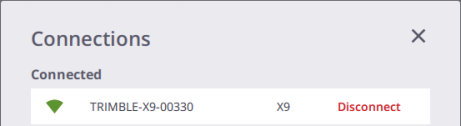
Tap a scanner name to connect to the scanner. The chosen scanner appears in the Connected list.
-
Optionally, tap Disconnect and choose another scanner to connect.
-
Tap
 .
.
-
& - Use the approved cable P/N 53099032 for connecting to the scanner. This Hirose 6P-PC to USB 2.0 cable has been designed for high-speed data transfer. The scanner powers On automatically after the controller is switched on.
-
 - Use the approved RJ45 Ethernet cable for connecting to the scanner.
When you are connected to a scanner with a cable, you cannot switch to the wireless connection with the same scanner. Disconnect first the cable from the scanner, and the software reconnects automatically to it in wireless.
Once connected, Perspective checks for the atmospheric correction set for the scanner (only an X9 and if the Atmospheric Correction option has been enabled in Settings > Scanner), and prompts to define a new value or to use the value of the scanner if it does not match the value used in Perspective (see Apply Atmospheric Corrections)
At the same time, a notification pops up and the Scanner, Connection, Scanner Battery and TID Signed In (or TID Signed Out) icons are displayed:

-
- Scanner (A), Wireless Signal (B1) (wireless connection), USB Connector (B1) (cable connection), Scanner Battery (C) and TID Signed In (E).

-
- Scanner (A), Wireless Signal (B1) (wireless connection), USB Connector (B2) (cable connection), Scanner Battery (C), Atmospheric Corrections (D), and TID Signed In (E).

You will be disconnected from your scanner if the firmware version is not up to date compared to the release version of the software. Use Trimble Installation Manager for Windows to update your scanner firmware. For more information, refer to the Trimble X7/X9 3D Laser Scanner's User Guide.
-
- Scanner (A), Wireless Signal (B1) (wireless connection), or RJ45 Ethernet Connector (B2) (cable connection), Scanner Battery (C), and TID Signed In (E).

Tap any icon to open the Scanner panel. It displays the following information:
-
Scanner in use (name, configuration (Core LT, Core or Premium) for X9 only, reference number and firmware version).
-
Scanner battery's charge level.
-
Storage space left in the memory card.
-
W-Fi settings (Frequency Range, Channel and Signal Strength in percentage).
In the Scanner panel, tap:
-
&
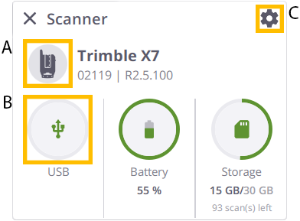
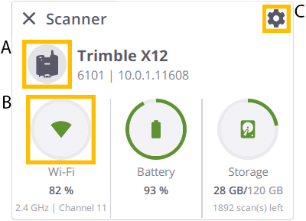
A - The scanner icon to open the Connections panel.
B - The Wireless Signal (or USB Connector, or RJ45 Ethernet Connector) to open the Wi-Fi Advanced Settings panel (see Define Advanced Wi-Fi Settings).
C - The Settings icon to open the Settings panel (see
Settings > Scanner). -
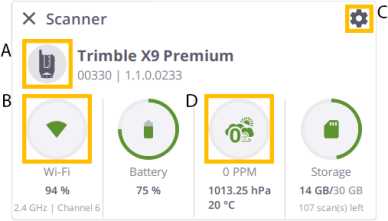
D - The Atmospheric Correction icon to open the Configure Atmospheric Corrections panel (see Apply Atmospheric Corrections).
The Start Scan button displays in the Map View and a station is automatically created:
-
The first station if the loaded project is new.
-
The next station if the loaded project already contains some stations.
A Station is typically a scanning position from which you capture a 360° scan (Full Dome) and a series of scans on a specific area of interest (Area).
From now, you are ready to scan with the default parameters (see Capture Scans), or you can level the scanner (see Level a Scanner) and/or define the scan and image parameters (see Define Scan Parameters and Define Image Parameters) instead.
![]() &
& ![]() - You can connect two controllers (a tablet with Trimble Perspective and an Android (or iOS) phone with Trimble Perspective Mobile) at the same time to a scanner via Wi-Fi. Refer to the Trimble Perspective Mobile user manual for connecting an Android or iOS phone. Use both controllers to control and capture the data. See Hybrid Workflow to Capture the Data.
- You can connect two controllers (a tablet with Trimble Perspective and an Android (or iOS) phone with Trimble Perspective Mobile) at the same time to a scanner via Wi-Fi. Refer to the Trimble Perspective Mobile user manual for connecting an Android or iOS phone. Use both controllers to control and capture the data. See Hybrid Workflow to Capture the Data.
