Capture Scans
You should always stay clear of the scanner during the scanning process to avoid obstruction of data acquisition.
Either you can capture a 360° scan (Full Dome) or a scan on a specific area of interest (an Area). The first station of a new project (or the new station of an existing project) is always a full dome scan.
The name of the first station displays above the Start Scan button.

Tap the Start Scan button. If no parameters have been previously defined, the default values are used (Full Dome scan, 2 minutes Scan Duration, Standard Scan Mode, and Images mode off).
A scan acquisition is a sequence of the following steps:
-
INITIALIZATION: This initial step consists in executing a Tilt measurement (see Self-Leveling) and / or an Auto-Angular Calibration). The scanner starts collecting data once this step is done.
To interrupt the step, tap Stop.
An Auto-Angular Calibration is run before each scan until the temperature in the scanner becomes stable.
-
DATA COLLECTION: The scanner rotates clockwise around its axis to capture data. Once done, the scanner turns back counterclockwise to its initial position.
To pause and resume a scan in progress, tap Pause and Resume.
To completely interrupt a scan in progress, tap Stop and Stop.
-
The scanner executes an Auto-Distance Calibration process before each scan.
-
The software performs a Tilt measurement at the end of a scan and compares the results with the first Tilt measurement. See Invalid Station.
-
-
DATA DOWNLOAD: Once the scan has ended, the captured data is saved on the memory card as a TZF format file under the ScanData folder, and downloaded to the application database.

Once the download step is completed, the captured data displays as a point cloud in the Map View (see Visualize the Scan Data > Map View) and as a station in the Stations List panel (see Manage Stations), and the next scan name displays above the Start Scan button.
-
AUTO-ORIENTATION: This step consists in finding the correct orientation of the captured data. It is always applied to the first captured scan.
To interrupt the step, tap
 from the Stations List panel.
If you are not satisfied with the orientation, change it by tapping the scan marker,
 and use the manipulator to orient the scan along the X and Y axis.
-
NEXT CAPTURE STEP: This step depends on the Images mode (see Define Image Parameters):
On - The scanner will capture the images immediately after. Wait until the end of the images acquisition (see Capture Images) to capture the next step (Capture the Next Scan).
Off - The scanner will not capture the images. After the Data Download step, capture the next (see Capture the Next Scan).
Press and release the On/Off button (called scan Push button) on the scanner less than 1 second to capture a full dome scan without using a controller. The captured data is stored on the SD card and downloaded to the controller once the scanner is connected (see Synchronize Data) or plug the SD card to the controller and use the Import feature (see Import a Project (or a Scan)).
The settings for the scanner's scan Push button are the last used ones or the default ones (if using the scanner for the first time). Any change in the settings in the application is immediately taken into account by the scanner for the next scan.
The multi-color LEDs on the scanner blink blue during the whole scanning acquisition step.
A scan acquisition is a sequence of the following steps:
-
INITIALIZATION: The scanner rotates clockwise to position itself to the acquisition position.
To interrupt the step, tap Stop.
-
DATA COLLECTION: The scanner rotates clockwise around its axis to capture data.
To pause and resume a scan in progress, tap Pause and Resume.
To completely interrupt a scan in progress, tap Stop and Stop.
-
DATA DOWNLOAD: Once the scan has ended, the captured data is saved to the internal memory of the scanner as a TOS format file, and downloaded to the application database.
-
DATA PROCESSING: The TOS format file is converted to the TZF format.
-
AUTO-ORIENTATION: This step consists in finding the correct orientation of the captured data. It is always applied to the first captured scan.
To interrupt the step, tap
from the Stations List panel.If you are not satisfied with the orientation, change it by tapping the scan marker, Register and use the manipulator to orient the scan along the X and Y axis.
Decide whether you want to capture a full dome scan or simply augment your survey data with a scan of a specific area of interest.

To ensure the best productivity and registration results, follow the rules below when moving the scanner:
-
Keep the scanner attached to the tripod when moving from one position to the next.
-
Maintain a good overlap with the previous scan or the scan you intend to register to.
 &
& 
-
The scanner should not be tilted by more than 45° when moving to ensure best results with the IMU.
-
Keep the distance between consecutive positions less than 10 meters. Depending on the environment you may need to have between 2 to 10 meters between scans.

-
Keep the distance between consecutive positions less than 10 meters when scanning outside with high resolution scans (> Middle).
-
Keep the distance between consecutive positions less than 2 meters when scanning inside with low resolution scans (<Middle).
Having enough overlapping areas in scans and limiting the distance between positions help ensure good scan registration.
-
Tap Start Scan. By default, the current scan will register to the last scan (see Automatic Registration).
The settings for the (full dome) scans are persistent (the last used ones). Any change of the settings in Perspective is immediately taken into account by the scanner for the next scan.
To enable the Area Scan feature, be sure to toggle on the Self-Leveling option in  Settings > Scanner and to have a leveled full dome scan. To ensure the best result, do not move the scanner from the first scanning position.
-
Tap
 Add Area. The view switches to Station View, the Area panel opens and the first area scan can be configured (Area 1).
 -
Choose an Area Type:
-
Optionally:
-
Auto Selection / Rectangle: Drag and drop a corner to enlarge or reduce the rectangle.
-
Horizontal Band / Vertical Band: Drag and drop a point to enlarge or reduce the band.
After defining an area, an estimate of the duration (in minutes and seconds) and of the number of points are displayed.
When an area scan is horizontally bigger than 180°, the scanner will scan it with one face (for an X12 only).
Tap
 ,
,  or
or  to undo, redo or reset the area scan.
 -
-
Optionally, define the parameters (see Define Scan Parameters or Define Image Parameters).
-
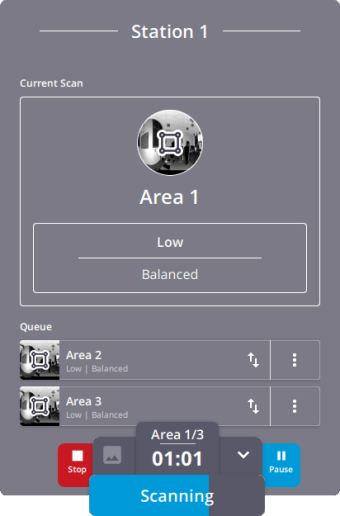
Tap Start Queue. The area scan automatically starts; it can be paused and resumed by tapping Pause and Resume.
-
Define additional area scans, if needed. For each new area scan, click Add to Queue.
The area scans added to the queue will automatically start as soon as the first area scan is completed.
The settings for the (area) scans are persistent (the last used ones). Any change of the settings in Perspective is immediately taken into account by the scanner for the next scan.
-
Tap
 to close the Area panel.
 -
To stop an area scan (Area N), tap:
-
Stop next to the Scan button. Perspective stops the scanning queue. Tap Start Queue to start the queue from Area N+1 and so on.
-
Stop from the Queue panel. Perspective stops the current area scan (Area N) and continues scanning the rest of area scan(s) (Area N+1, Area N+2, etc.) in the queue.
To display the Queue panel, tap
next to the Stop button while the scanner is scanner.
You can add new area scans to the queue by tapping Create New and Add to Queue.
If you stop an area scan while the scanner is:
-
Scanning, Perspective keeps what has been scanned.
-
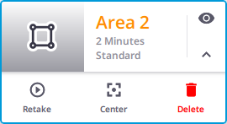
Initializing, Perspective keeps what has been scanned. In the Station View, the area scan remains displayed in dashes and orange. In the Queue panel, the area scan has its name displayed in orange. If required, tap Retake to rescan the area scan.
Once an area scan has been stopped, toggling off the Self-Leveling option will close the Area Scan tool (if it is opened), and will clear the queue (if there was one). At the same time, a notification will pop up.
-
-
Optionally, tap the pull-down arrow to open the Current Station panel.
-
Tap.
-
 and choose
  (or
(or  ) to change the order of an area scan.
 -
 and choose
  (or
(or  ) to edit (or delete) an area scan.
Editing an area scan puts the area scan to the end of the queue.
-
-
If
Edit has been chosen, the selected area scan panel opens. Change the shape of the area scan and/or update the parameters (see Define Scan Parameters or Define Image Parameters) and tap Save. The Queue panel opens. Tap:
-
 or
or  to hide or to show an area scan.
 -
 and choose
  or to center an already captured area scan in the Station View or delete it.
 -
and choose , or ,or to edit an area scan to be captured, or to center it in the Station View), or delete it.
-
Create New to create a new area scan.
Tap Close.
-
With the Indoor mode, the Area Scan feature is:
-
Enabled with an X9.
-
Disabled with an X7.
For each scan (full dome or area), a scan file is created and saved to:
![]() &
& ![]() -The memory card under the ScanData folder and the software database, as a file in TZF format.
-The memory card under the ScanData folder and the software database, as a file in TZF format.
![]() - The scanner internal memory as a file in TOS format, under the project folder and the software database, as a file in TZF format.
- The scanner internal memory as a file in TOS format, under the project folder and the software database, as a file in TZF format.
When a scan is in progress, the following cannot be changed:
-
- The atmospheric correction value (see Apply Atmospheric Corrections), the Atmospheric Correction icon and the related option in Settings > Scanner are On and grayed-out.
-
The Self-Leveling status. The Self-Leveling option in
Settings > Scanner is On and grayed-out.
Once the scan is finished, the options become enabled again. Turning the Self-Leveling option Off will disable the Area Scan feature.
