Create and Edit a Utility Run
Use the Create Utility Run command to create groups for related series of connected utility lines/pipes (that are also part of a larger utility network). Often, you will create runs before you create the pipes that go into them. A utility run (also known as a pipe run) is used to determine the order (by station) in which pipes and nodes will be reported in reports such as the Utility Takeoff Report. A utility run can also be used to organize your data and establish a beginning station and flow direction for fluids in a gravity system.
Use the Edit Utility Run command to move or copy utility lines from any number of other utility runs to a specified utility run. Typically, you will use this to re-organize pipes into the appropriate runs after you have automatically created utility lines using the Create Utility Line command.
You can also reverse the direction of the lines in the run using the Reverse Utility Run command, which only changes the stationing direction of the run. When you insert trench templates into a run, they are listed in station order in the Project Explorer.
Note: Utility lines (pipes/cables), nodes, and runs that belong to a network cannot be moved to another network.
Run stationing
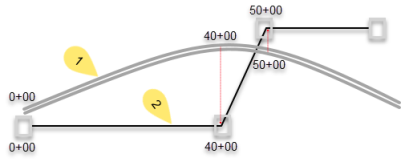
When creating a utility network, a run is used to determine how the pipes are drawn and reported with station zero being on the left and the stationing increasing to the right. It is faster to create multiple runs at the same time. You can put pipes in any order, and they will sort from bottom up. The beginning and ending node sequence, however, must allow the end of one pipe to connect to the beginning of the next. A run should be made of continuous pipes, as a surface will be created for each run. To determine stationing along a utility run, select the run in the Project Explorer and use the Explore Object command.

D = distance along (station); E = elevation
Figure: Stationing in a utility run
Prerequisites:
- Licensed module; See the Subscription Plans page. For a license matrix by command, see the License page in the TBC Community. Also see View and manage licensed features.
- Utility network
To access the commands:
- Select Create Utility Run in Utility > Create Utilities.
- Select Edit Utility Run in Utility > Edit Utilities.
To create a utility run:
- In the Utility network list, select the network of which the run is a part.
- In the Name box, pick an object in a graphic view to use its name or type a unique identifier as you want it to appear in the Project Explorer and Selection Explorer. You can also use the name to select the run in the Advanced Select command.
- Select the layer on which you want the run to reside in the Default layer list, or select <<New Layer>> to create a new layer for the run.
Note: The layer you choose here becomes the default layer for trench templates and trench linework (shown in the Properties pane), if applicable; this helps keep trench-related objects on the same layer as the runs. You may want to make this different than the layer you set for the utility network.
- Select an in situ material in the Native material list. This material will automatically be assigned as the top backfill material when you create a utility trench template. This field will only display earthen (mass earthworks) materials. See Specify Trench Backfill Materials for more information.
Note: Earthen (select) materials are typically processed offsite and/or purchased as fill materials, so (unlike earthen (mass earthworks) materials) they are not applicable to select and use as native materials.
- From the Start station box, enter the station value you want for the first node at the beginning of the run. For example, if you have a smaller run coming off of a main run at the main run's 20+00.00, you might want the smaller run's stationing to begin at 20+00.00.
- To base the utility run's stationing on the stationing of a nearby alignment, select the alignment in the Reference alignment list.
Note: The effects of this association will appear in an upcoming version.
- Click Apply. The run appears under its parent utility network in the Project Explorer.
To edit (add pipes to) a utility run:
- In the Utility network list, select the network of which the run is a part.
- From the Utility lines to move box, select pipes or cables to move to a new run of the same network type.
- In the Utility run to move to list, select a different run to move the selected utility lines to.
- Click Apply. The pipes appear under the run in the Project Explorer, and the name in the Name box auto-increments so you can add additional runs with sequential numbering.
Note: You can switch a utility line from one utility run to another in the Properties pane for the line, as long as the run you are changing to is in the same utility network. Each pipe must order the nodes appropriate for the node, meaning that each pipe should be from and to, downstream to upstream.
Dependencies:
- Runs are not dependent upon their child pipes and nodes; you can delete a pipe or node without deleting the run (although it could create a gap in the run).
- Pipes cannot exist outside of a parent run, and if you delete a run, the pipes and nodes it contains are also deleted.
- The order of pipes in a run is automatically determined by their geometry.