Create a Machine Data Surface
Use the Create Machine Data Surface command to create a surface from machine data (brought in the form of a machine data overlay). Then you can review the surface using a variety of surface tools, such as the Surface Slicer View. Create multiple surfaces from different overlays (e.g., measured on different dates) to compare, measure volumes, and plot them in relation to each other for as-built documentation.
Machine data surfaces maintain all the properties contained in the machine data overlay, such as date filters and pass count data, but in a 3D form that you can more easily investigate for anomalies. To make surfaces smaller (for better performance), reduce the density (e.g., to a 10m sampling grid rather than the default 0.3m grid) of the data from WorksOS. This density filter is also based on the selected overlay's properties.
Prerequisites:
- Licensed module; See the Subscription Plans page. For a license matrix by command, see the License page in the TBC Community. Also see View and manage licensed features.
- Machine data overlay
To access the command:
- Select Create Machine Data Surface in Construction Data > Machine Data.
To create a surface from machine data:
- In the Overlay list, select the overlay from which to generate points used to create a surface, or select <New> to create a new overlay from WorksOS data.
Tip: When you create overlays in the Create Machine Data Overlay command, give them descriptive names to make them easier to choose in this list.
- In the Surface prefix box, enter an alphanumeric value that will help you group or categorize the surfaces you create, e.g., if you use the same overlay to create all the surfaces by editing the overlay each time.
- For the Grid reference point, pick or enter the coordinate from which the surface be built. This grid origin defaults to 0,0.
- In the Grid direction box, enter the angle that determines the direction in which the grid is created.
- To control the surface's density, edit the Grid spacing. Based on the interval you specify, a single, sampled point value is used at each grid location (nearby points are not averaged in this process).
- WorksOS can provide different types of data for each grid point, which enables you to build multiple surfaces, if desired. In the Surfaces to create section, check the boxes for one or more Data types.
- Elevation - Vertical distance (height) above or below mean sea level.
- Pass count - A measurement of the number of times that a machine (e.g., roller compactor) has traveled over an area on a surface.
- MDP - Machine drive power values recorded by compaction machine systems.
- CMV - A measurement of the relative stiffness of compacted material as measured by a sensor on a compactor.
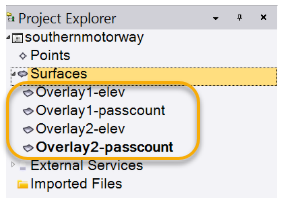
- The suffix for each surface will allow for organizing the surfaces by name. Here is a small preview of what that might look like:
- Click Create. The WorksOS data is downloaded and the surfaces are created (a point cloud is created from the overlay data and a surface is created from the point cloud) and named as defined. The end date of the filtered data is added to each surface as a Measured date property; this can help you keep track of what data was used to create the surface. The surface appears in graphic views as well as in the Project Explorer.
- Use the steps above to create additional surface,s as needed.
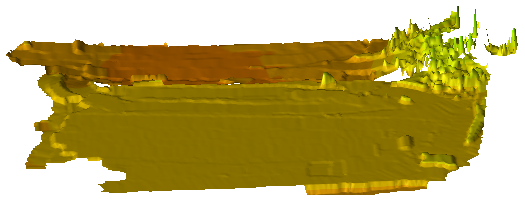
- Use 3D tools to investigate the surfaces:
- 3D View with vertical exaggeration
- Surface Slicer View
- Surface Contours
- Limit box for the 3D View
- Earthwork Report
Dependencies:
- The surface is dependent upon the underlying overlay and point cloud. If you modify the overlay and/or point cloud, the surface changes in response.
