Apply a Site Improvement to a Surface
Use the Apply Surface Site Improvement command to assign area-based site improvements to site regions on a surface. Site regions are shaded as you apply site improvements to them, enabling you to quickly confirm that they fill the intended area. In a machine data workflow, this allows you to create site improvements (and ultimately a subgrade surface) without going through the takeoff workflow.
Note: Using this command, you can only apply standard site improvements to a surface; you cannot apply specialized types of site improvements, such as Landscaping/Topsoil or Utility.
Note: If you select Properties > Show in Plan View > Shading > By material for the reference surface, the surface will display with the color of the upper-most material assigned to each site improvement. You have to rebuild the surface before the material will be shown.
Note: After you apply site improvements to a surface, you can run a Surface Information Report to see the areas of the site improvements.
Prerequisites:
- Licensed module; See the Subscription Plans page. For a license matrix by command, see the License page in the TBC Community. Also see View and manage licensed features.
- Surface
- Closed linestrings with the Surface sharpness property set to Sharp and texture boundary, that have been added to the surface
Note: If you are starting with closed polylines, you will need to edit them to convert them into linestrings. Then add elevations to the linestring's nodes, and finally go to the Properties pane to set the Surface sharpness property.
- One or more area-based site improvements (and the layers of materials used to build them) defined in your Project Library in the Material and Site Improvement Manager
To access the command:
- Select Apply Surface Site Improvement in Corridors > Subgrade.
To apply a site improvement to a surface:
- In the Add to surface list, select the surface to which the site improvements will be added.
Note: If you do not select a surface, the site improvement is still created, but not applied to any surface.
- In the Name box, type a unique identifier for the first site improvement's insertion point as you want it to appear in the in the Selection Explorer and Properties pane. You can also use the name to select the site improvement in the Advanced Select command.
Note: As you create multiple site improvements of the same type, the name is auto-incremented; the next number (a numeric suffix) is automatically appended to each name so the site improvements can be identified when they are listed together in the Takeoff Report.
- Select the layer on which you want the site improvement's seed point to reside in the Layer list, or select <<New Layer>> to create a new layer for it.
By default, the color of the layer does not affect the site improvement's color; the color is determined by the upper-most material layer used in the site improvement.
- Select the site improvement that you want to assign to a region in the Site improvement list.
- If the site improvement type you need is not in the list, select <New>. The Material and Site Improvement Manager displays.
- Create the site improvement (and the materials it uses) and click Close.
- From the Improvement location box, pick a point in the Plan View that is within the closed linestring you want the site improvement to fill. If you type in a coordinate for the location, click Apply to add the site improvement to the surface. The point you pick becomes the site improvement's seed point.
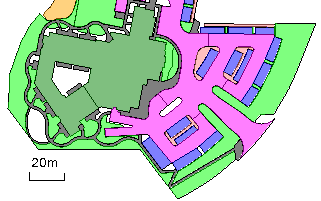
A site improvement indicator (dot) appears at the location and the region floods with the color assigned to the area-based site improvement. The site improvement fills the area until it reaches either a texture boundary or the edge of the surface. Each area can only contain one site improvement.
- Repeat steps 4 - 5 to apply other site improvements.
- Click Close when you are done. The site improvement's depth/volume is not apparent until you create a subgrade surface.
Scenarios:
- If your surface is shaded by elevation, when you add the site improvement, the shading is automatically set to By material.
Dependencies:
- The extents of a site improvement (and its subsequent volume calculations) are dependent upon the lines that encompass it. If you change those lines, the site improvement is updated.
Validating site improvement areas
- You can still use the Validate site improvement areas command to create shaded polygons, but this is no longer recommended as they are different objects than site improvements, and they do not update to reflect subsequent edits.
